How to SHIP an API
Building APIs is a complex process especially when you need to integrate multiple 3rd party integrations. BuildShip empowers you to effortlessly design, deploy, and manage APIs, providing a user-friendly platform that accelerates your development cycle.
Learn how to build APIs step-by-step, leverage AI to build logic, focus on your business logic rather than intricate technical details.
How to create an API?
To begin creating an API, the initial step is to break down the API into smaller chunks. For example, let’s say we wish to build an app which generates custom audio story books based on a prompt provided by the end user of your app and also provide a cover image.
What we understand till now is we will call an API from our app’s front end which is gonna fetch the audio and cover image for the prompt provided by the user and display it on the front end.
But how do we break this down into small achievable steps? Let’s build this app together and see...
Step 1: When will the API be called?
According to our example, we are supposed to have an input on the front end for the user to enter the prompt for the audio story book. The user would then hit a “Generate” button which should send the prompt to the API, generate the audio story book and return it to the front end.
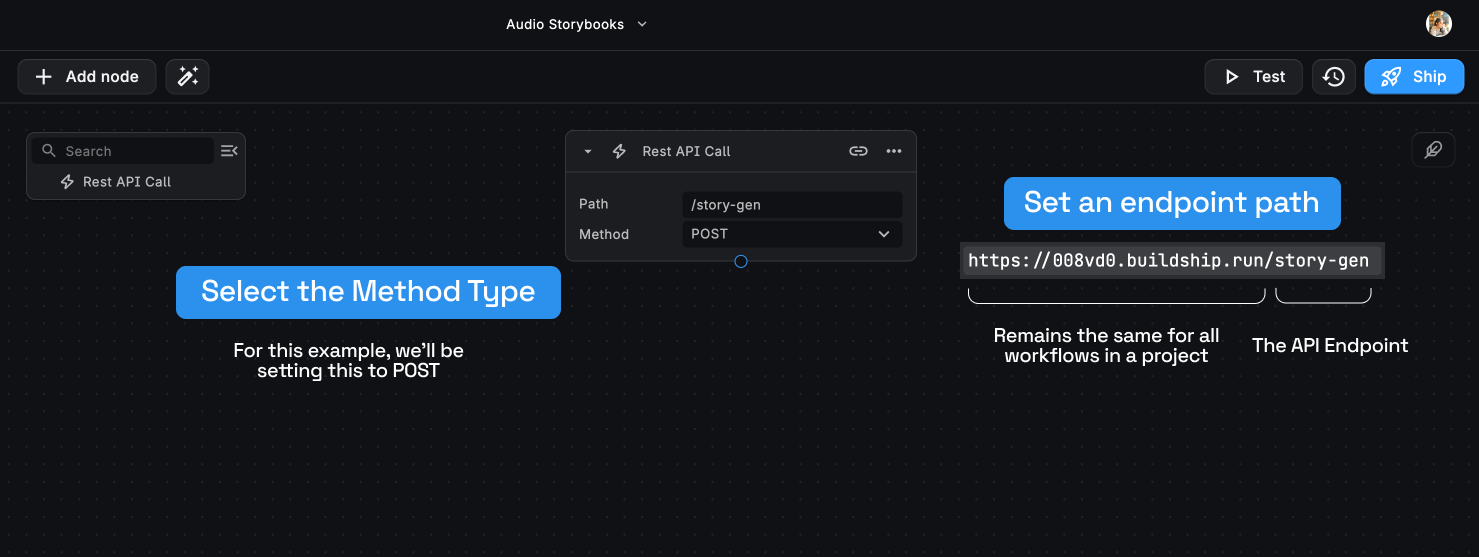
The “Generate” button sends an HTTP request to an API Endpoint which we’ll create using BuildShip. This is the starting point of our API, the HTTP Trigger.
Step 2: Specify the Request Structure
Now let us define the HTTP Request structure that is going to trigger the API Endpoint. An API Request has the following structure.
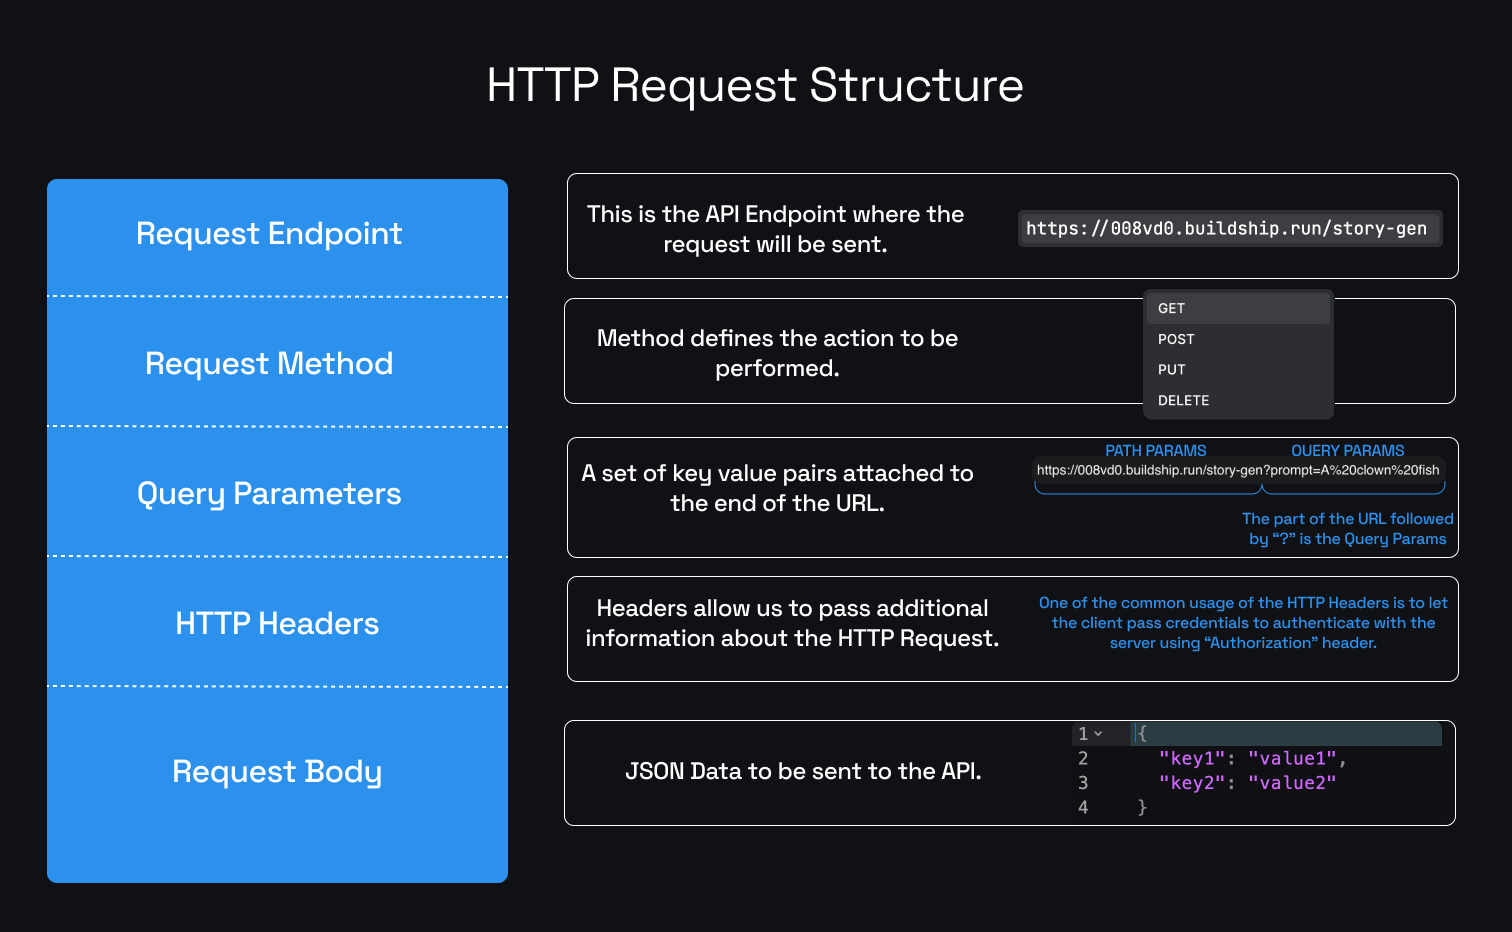
The Request Endpoint will be the Rest API Call Endpoint that we set, which is
https://008vd0.buildship.run/story-gen.
For the Request Method, we can pick from GET, POST, PUT, and DELETE. Each method has it’s own actions and
characteristics. To learn more about each of these methods, check out the
MDN Docs website (opens in a new tab). For this example, we’ll use the POST
request method.
The Query Params are the additional parameters to be appended to the end of the endpoint URL. We do have an option
to pass in the prompt via the Query Params as shown in the image above, but for this example we’ll pass in the prompt
with the style value in the request body.
We can also optionally add the HTTP Headers to pass additional information about the HTTP Request. To learn more about the Headers to include, refer to the MDN Docs website (opens in a new tab).
TIP💡: We also have a documentation on a very interesting use-case utilizing the Authorization Request Header to implement “Bring Your Own Key” (BYOK) using BuildShip. Learn more (opens in a new tab).
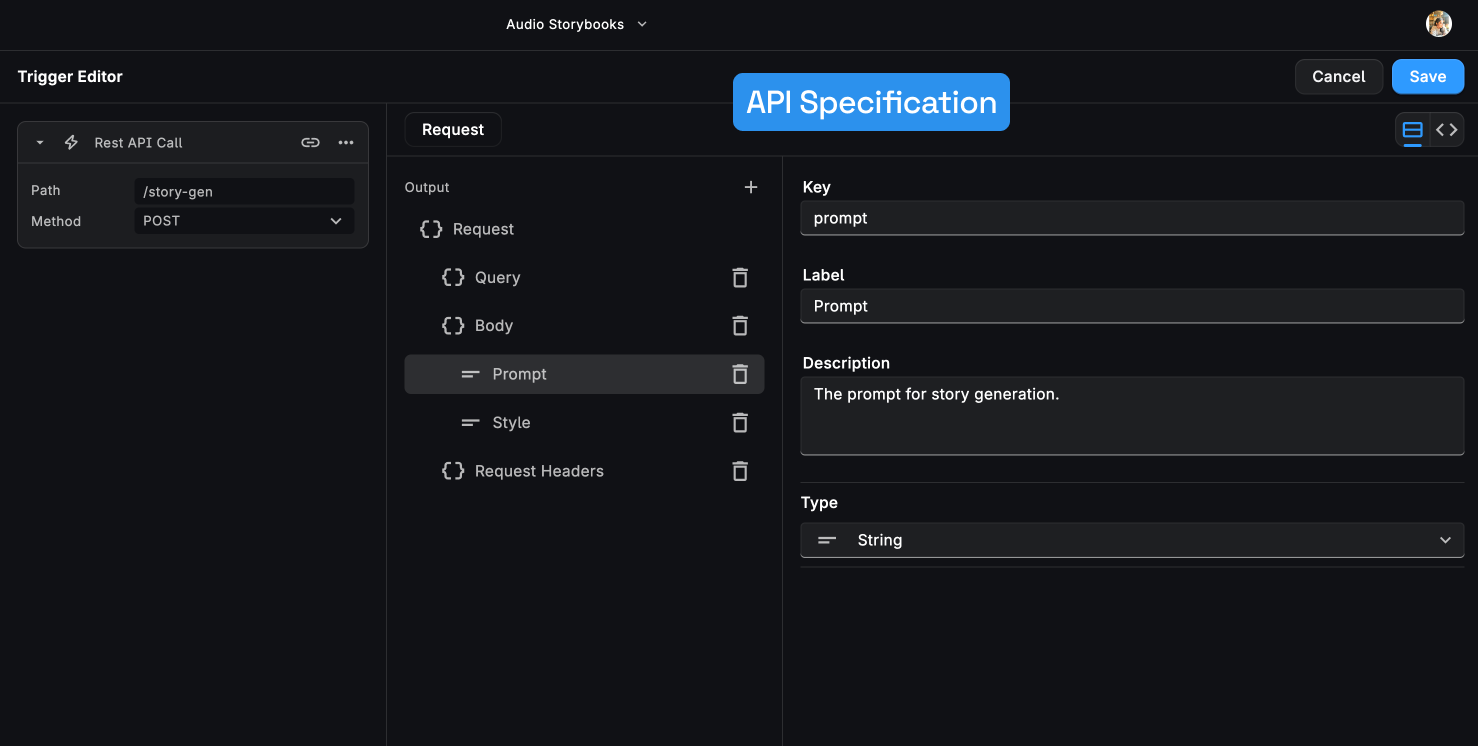
For the request body, let’s pass in the values we require for our API from the user which are:
- Prompt - The main story line for the generation
- Style - The author style for the story being generated. Let’s say you wish to generate a kids fairytale so we can input “Brothers Grimm” to generate similar stories.
The request body should look something like this:
{
  "prompt": "Two siblings discover the hidden mysteries of an enchanted garden",
  "style": "Brothers Grimm"
}For making it easy to access the values (opens in a new tab) for our request structure in the workflow input fields, we can specify the Request Structure in the REST API Call Trigger. Learn more (opens in a new tab).
Step 3: Generate the Story
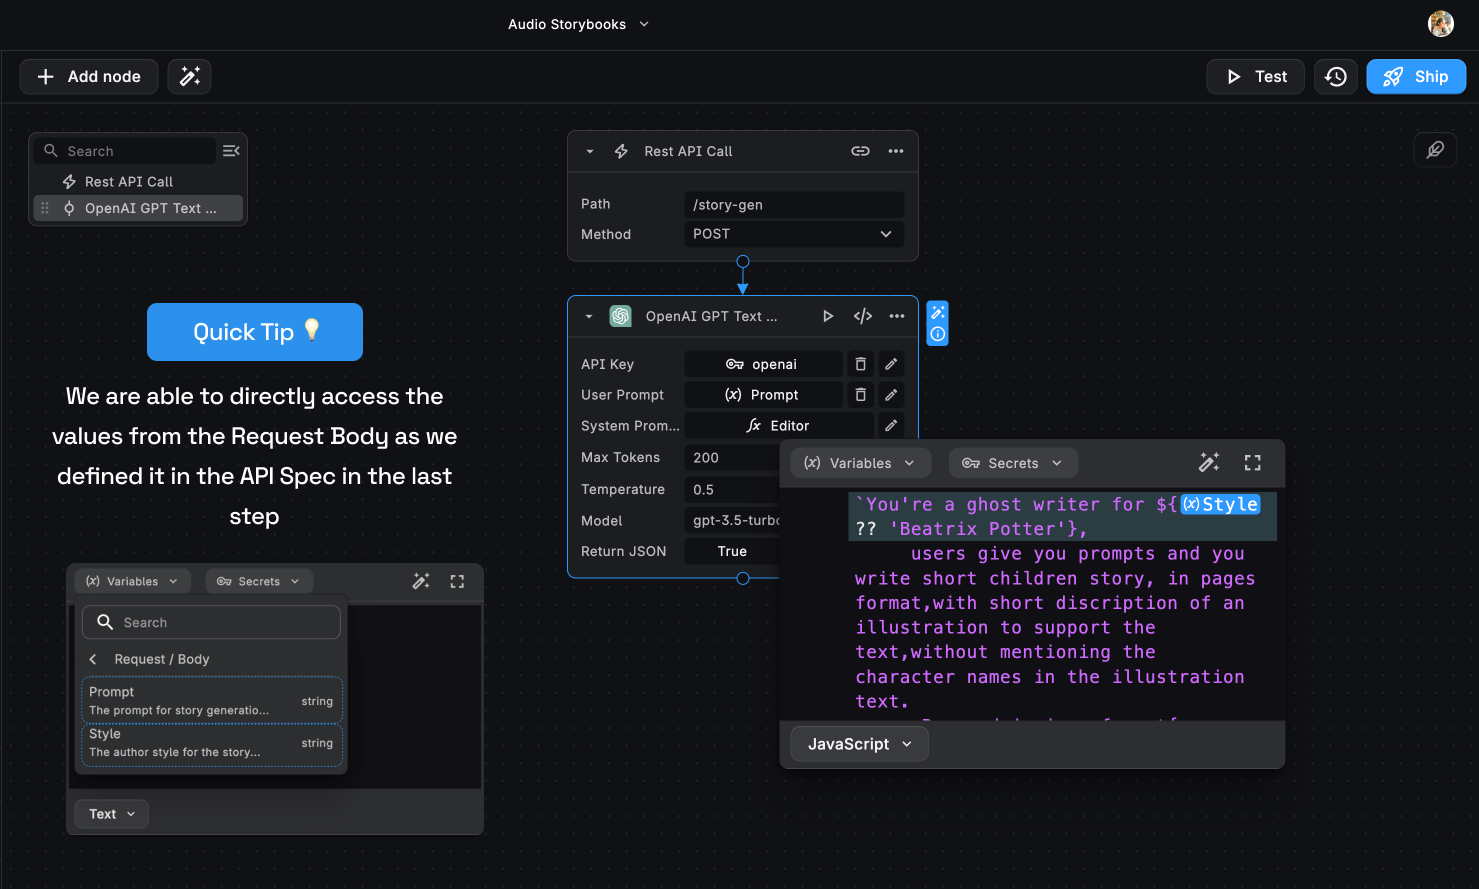
We can now get the prompt and style values from the request body, which we can now directly access from the context
menu.
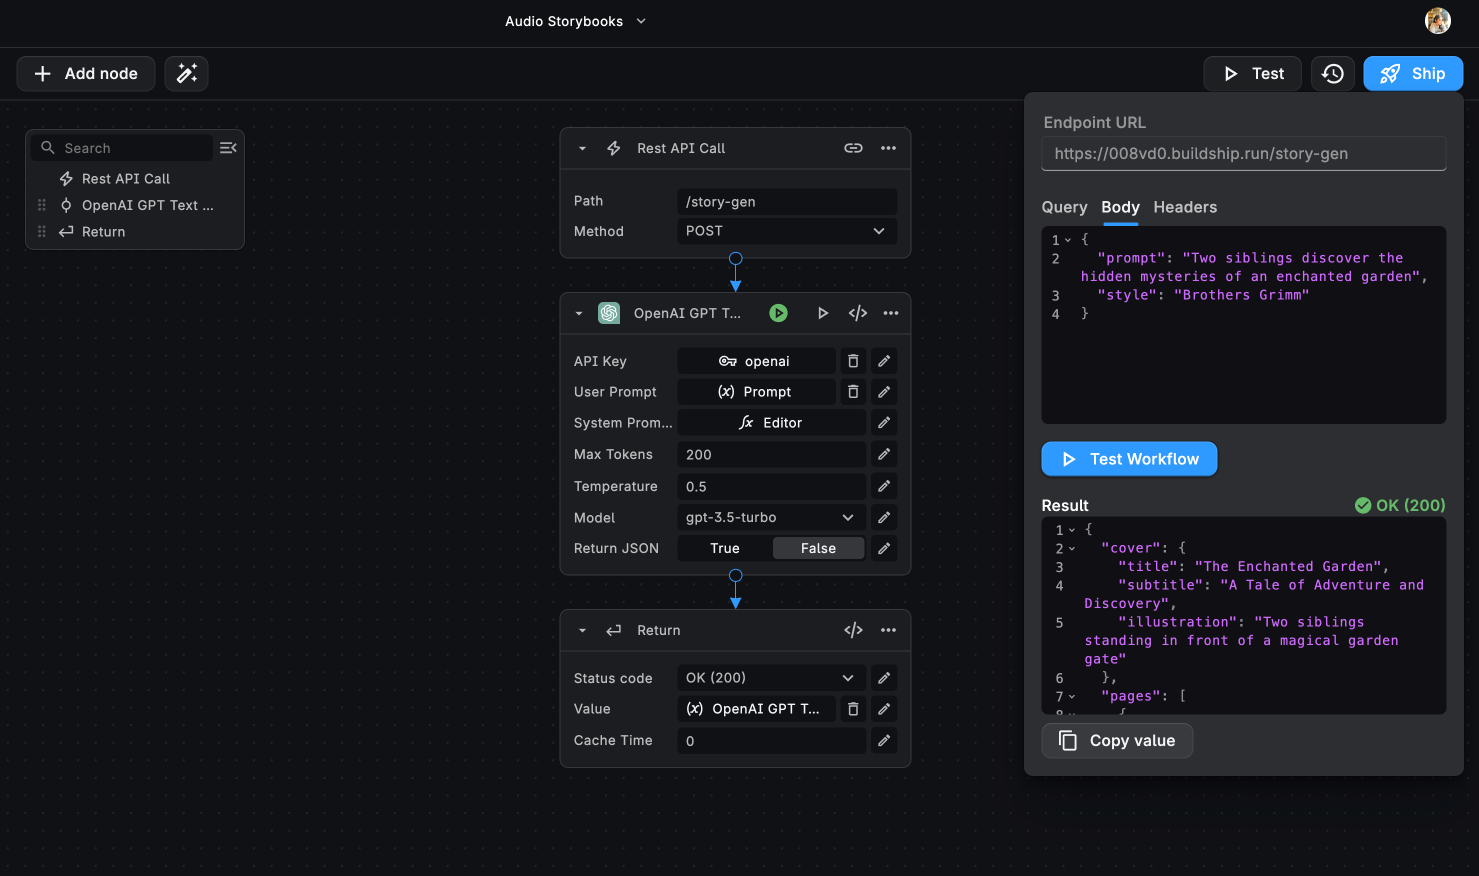
Now we need to generate our story via the prompt given by the user. Let’s use the OpenAI GPT Text Generator node to generate the story, along with the cover image description, for us.
Add the OpenAI API Key (which we can get from the OpenAI Developer Dashboard (opens in a new tab)).
We can securely store our API Keys in the BuildShip Secret Manager to maintain confidentiality and avoid misuse. Learn more (opens in a new tab).
For the System Prompt, let’s add:
`You're a ghost writer for ${ctx['root']['request']['body']['style'] ?? 'Beatrix Potter'},
     users give you prompts and you write short children story, in pages format,with short discription of an illustration to support the text,without mentioning the character names in the illustration text.
      Respond in json format{
      "cover":{
      "title":string,
      "subtitle":string,
      "illustration":string
      },
      "pages":[
      {index:number,
      "illustration":string,
      "text":string
      }
      ]
      }
      You are bedtime story teller. You will create:
      - A short bedtime stories that are meaningful, have a good moral, and creative
      - It should be safe for children to hear and no explicit content
      - No more than 6 pages
      - If you are unsure how to create a story say "{"error":"Sorry, I can't tell a story on that topic"}.
      `;
For the User Prompt, let’s pass the incoming prompt from the HTTP Request Body.
At any point, while building your BuildShip Workflow, we can use the Workflow and Node testing to check outputs and confirm the workflow is working correctly.
Step 4: Parsing the JSON output
Now we see that we get a stringified JSON object. Now to convert this into a JSON object we’ll be using the Parse JSON node to do this.
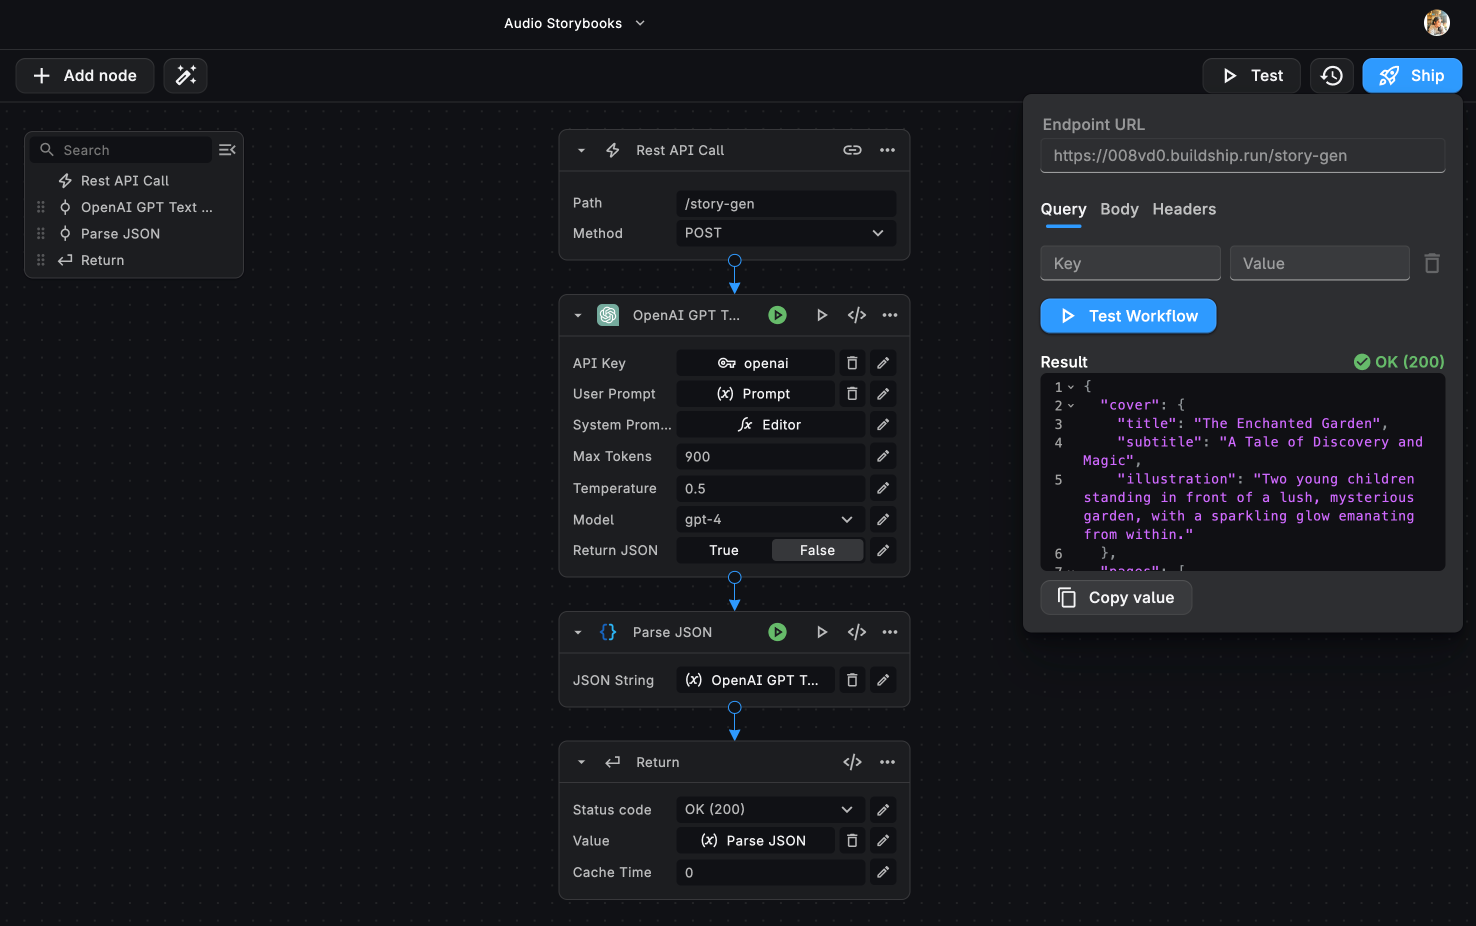
We can also test and ensure everything is working smoothly till this step.
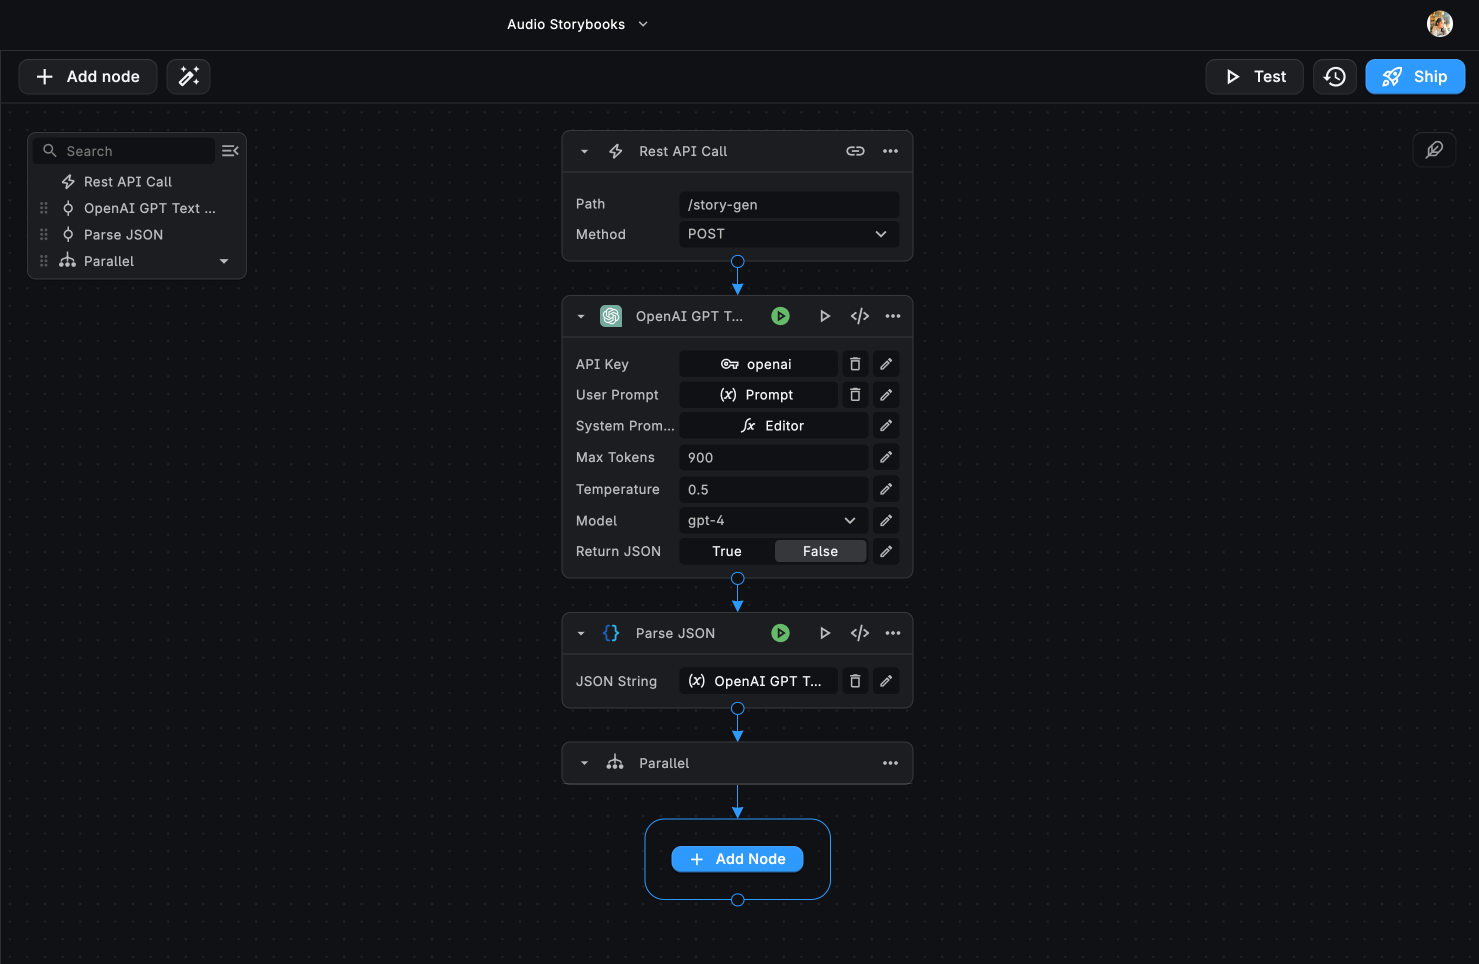
Step 5: Running flows in Parallel
Now we need to:
- Generate the audio file for the story
- Generate the cover image for the storybook
Both of these processes can be run in parallel. Let’s add a Parallel Execution node. Now, let’s discuss each of these processes one by one.
PARALLEL PROCESS 1: Generating a Cover Image
GENERATE IMAGE
Firstly, we need a node to generate an image based on the prompt provided by the GPT Text Generator Node.
If you search “Generate Image” in the node explorer, you’ll see BuildShip comes with a bunch of pre-built integration nodes for the same purpose - OpenAI DALL-E, StabilityAI Image Generator, Hugging Face Text to Image, Replicate Image Generation.
You can use any of these pre-built nodes for generating the cover image.
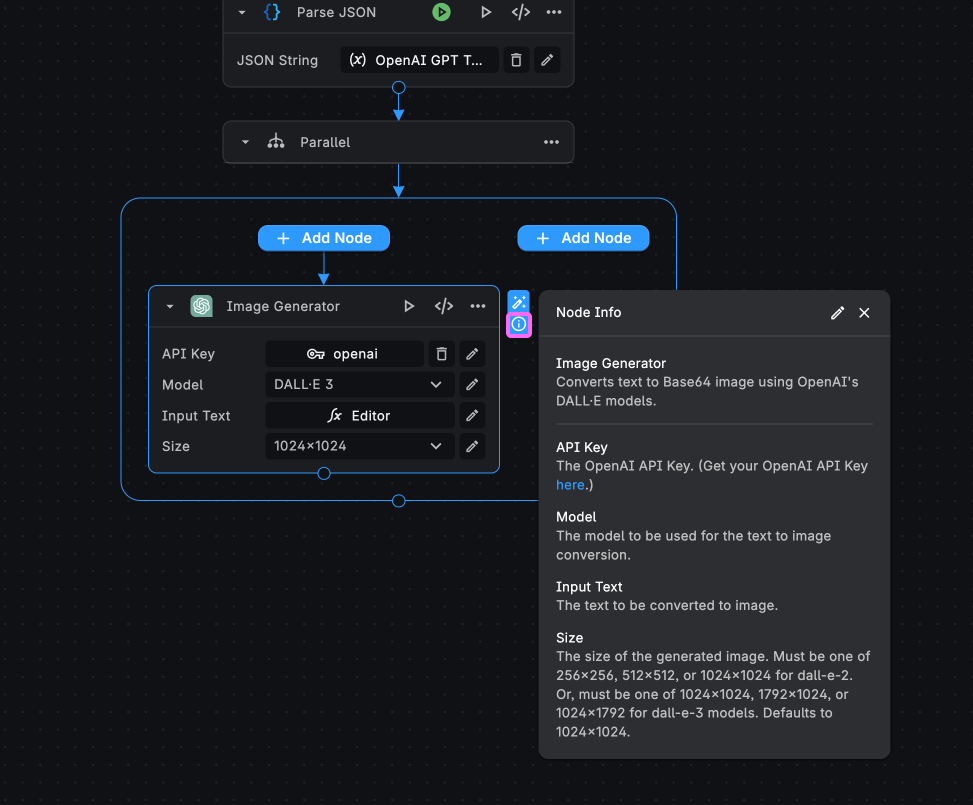
For this example, we’ll be using the OpenAI Image Generator node using the DALL-E Model. Add in your API Key and
pick the DALL-E Model. For the Input Text, we’ll be passing in the value for the cover.illustration from our Parsed
OpenAI JSON.
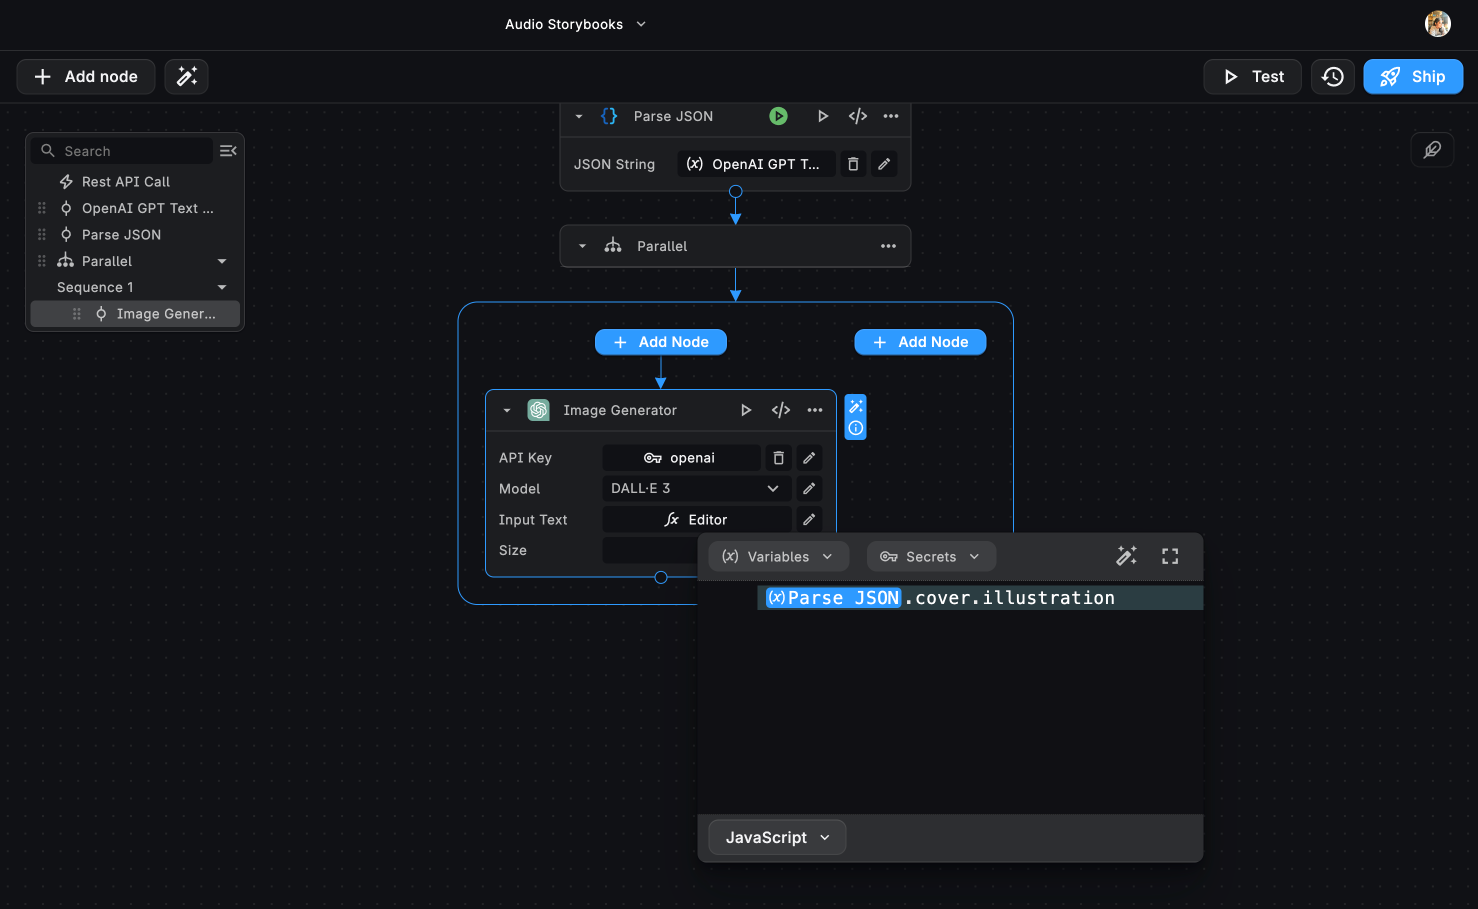
Pick a size. For this example, we’ll be using 1024 X 1024.
Clicking on the ℹ️ icon on the Image Generator node reveals a node info section which tells us everything we need to know about that node. This reveals that the generated output will be a Base64 file.
SAVE BASE64 FILE
Let’s search the nodes featuring the Base64 format. We see we have two nodes:
- Upload Base64 file to BuildShip File Storage
- Upload Base64 file to Google Cloud Storage
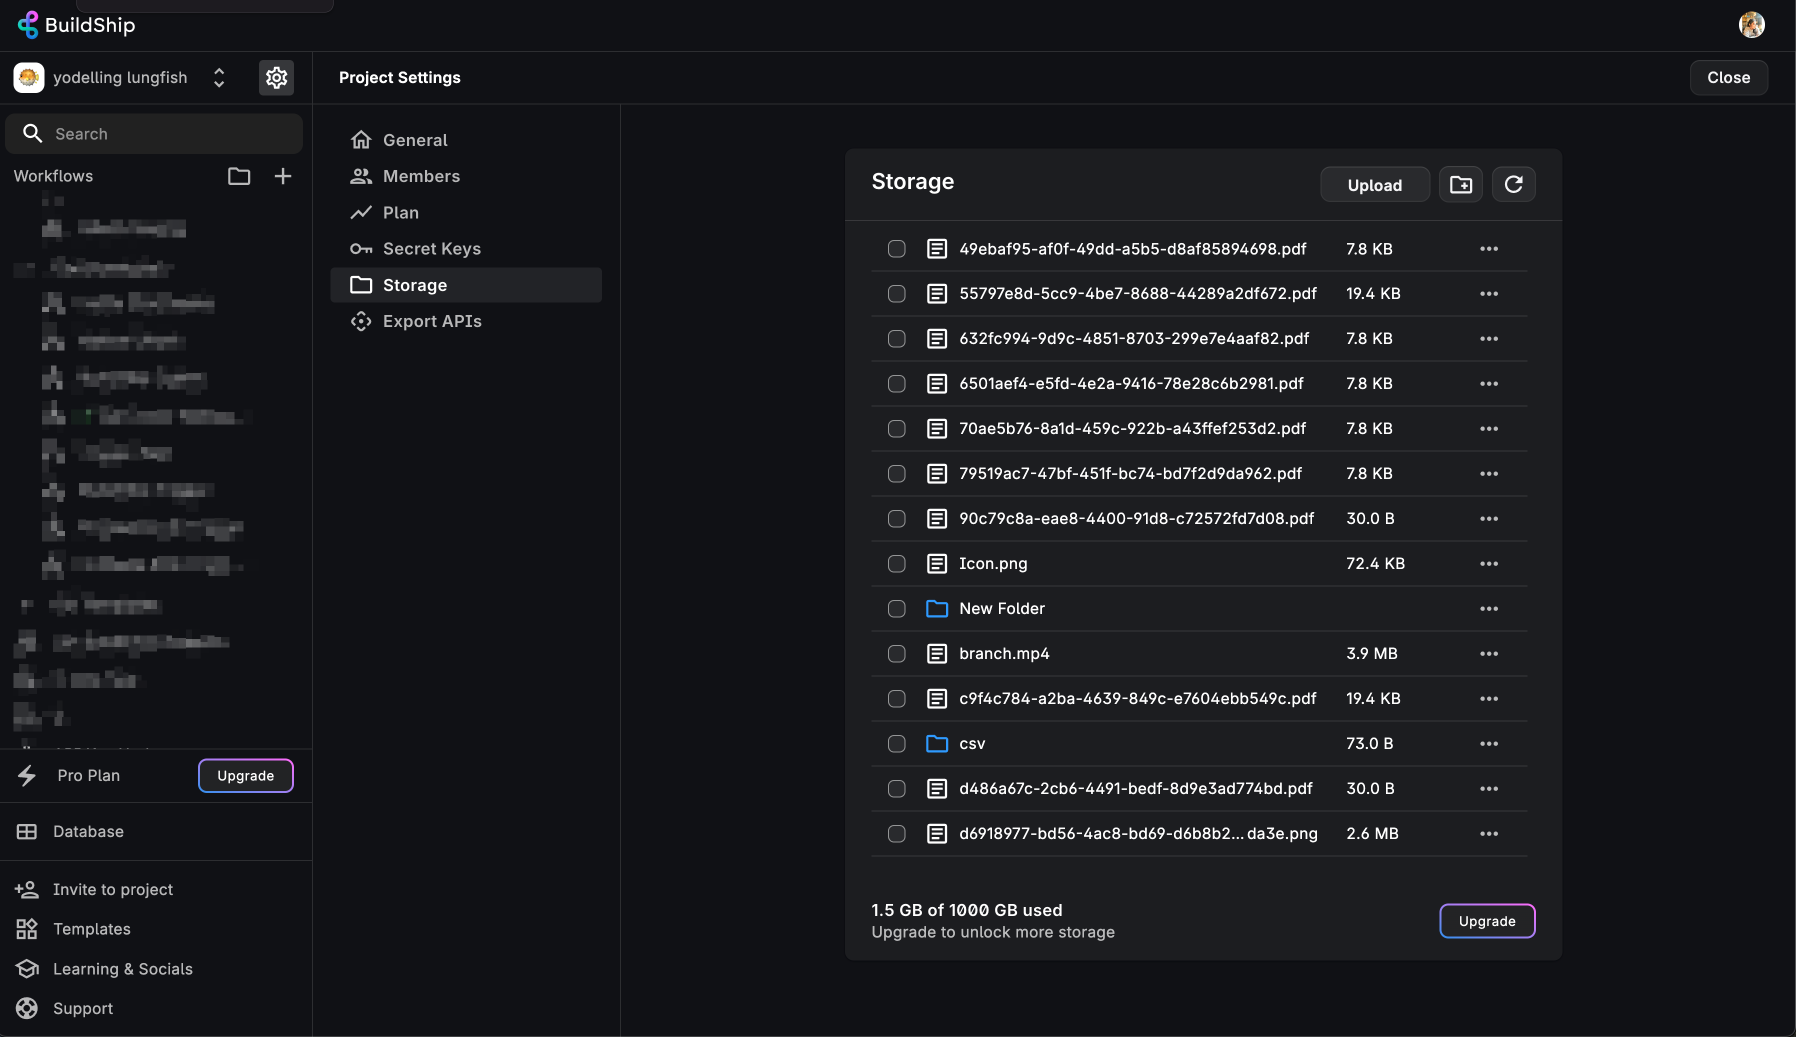
For this example, let’s use the BuildShip File Storage node which requires no set-up. We’ll be able to upload the Base64 file to a folder in the File Storage and returns the generated Public URL.
We can also access the files via the BuildShip Storage Manager available in the Project Settings.
For the **Upload Base64 File - BuildShip Storage** node, add the output file from the OpenAI Image Generator node.
For the file name, we’ll need to add a unique name every time a story is generated. We can achieve this by adding a UUID Generator node before the Parallel Execution, after the Parse JSON node.
In the File Name input for the Upload Base64 File node, we can define the entire path for storing the Image file. For example:
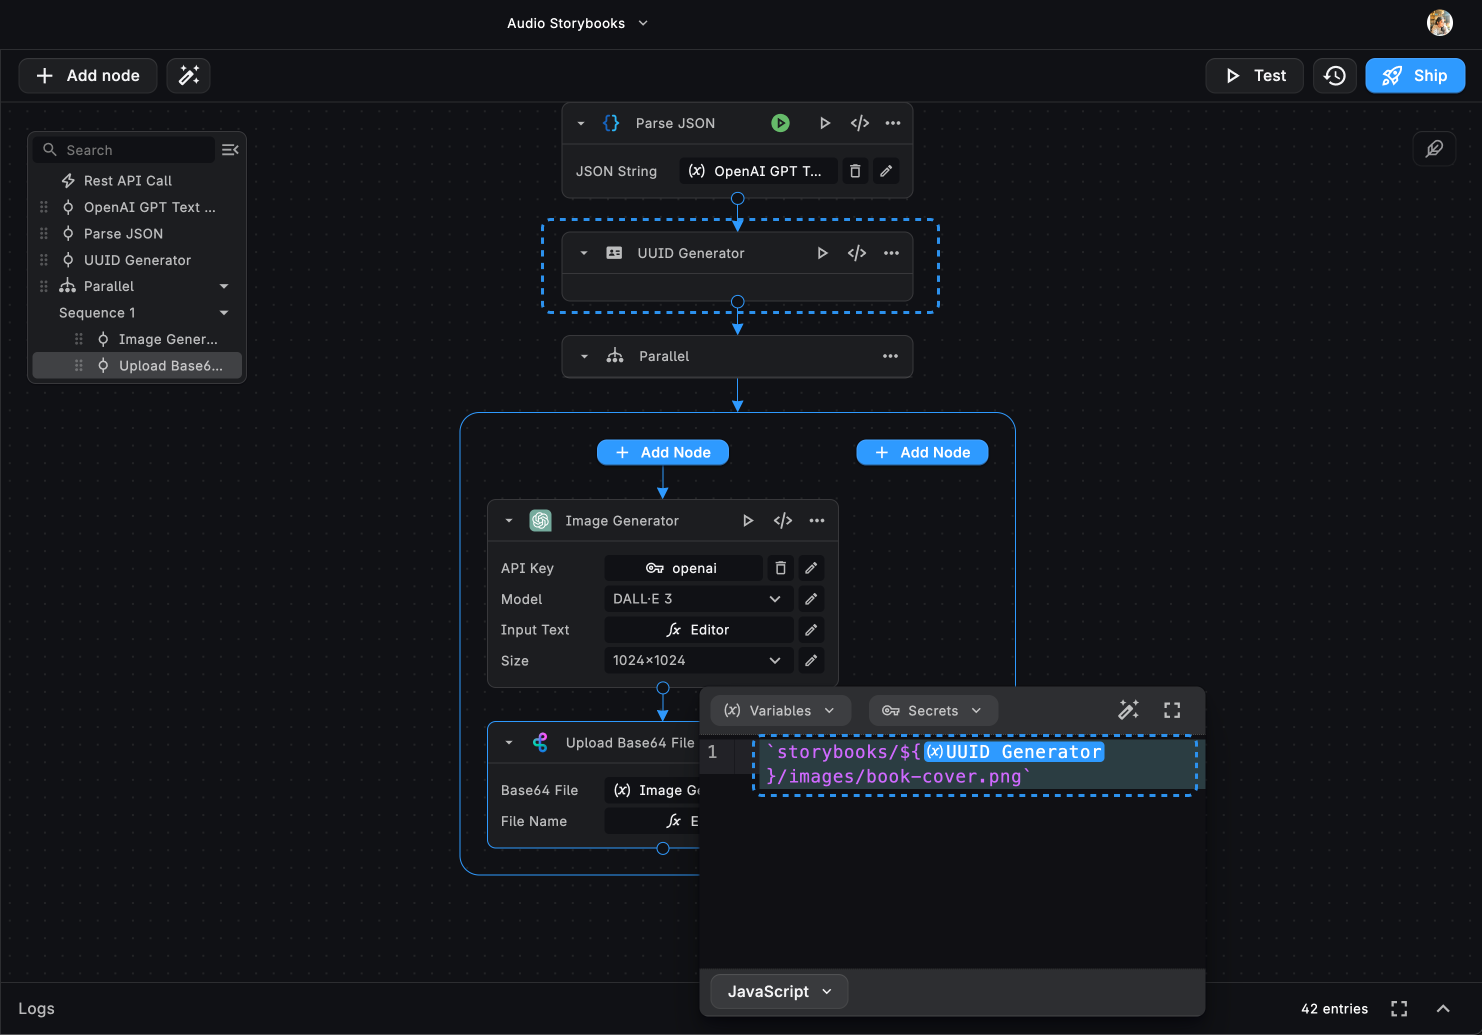
Our flow to generate the cover image for the story. Now, let’s build the parallel flow for generating the audio file for the Storybook.
PARALLEL PROCESS 2: Generating the Audio Storybook
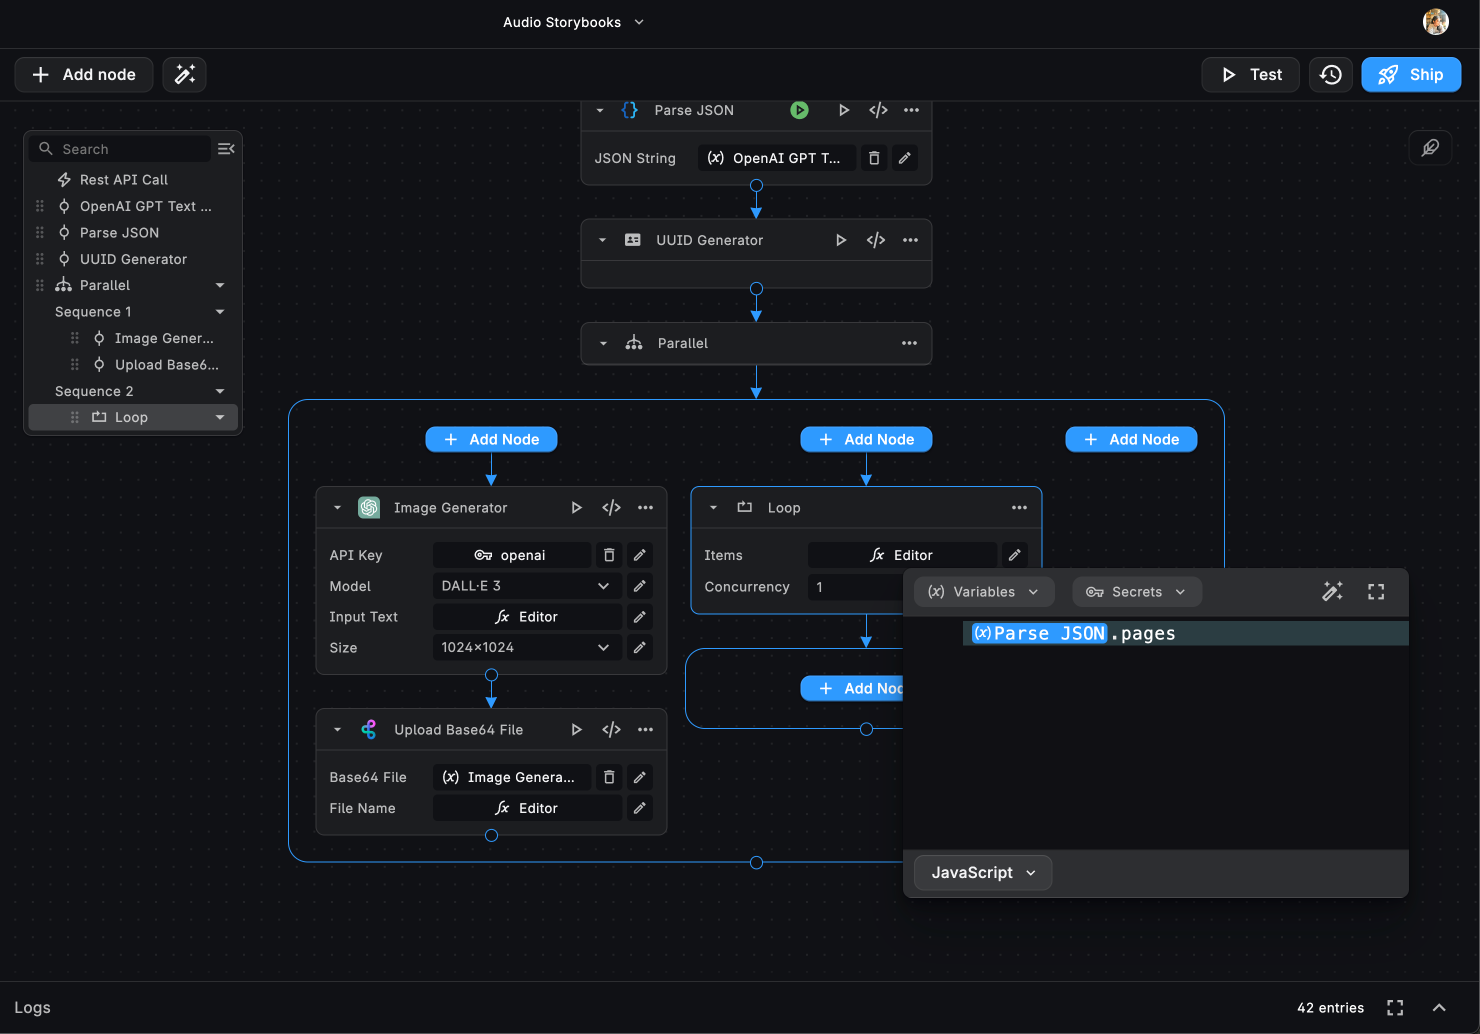
For generating the audio file for each of the story book page, we’ll require a loop. This will loop over each page’s text, generate an audio file, and upload the file to the BuildShip File Storage in each iteration.
ADDING A LOOP
The Items input requires an array to loop through. Let’s add the pages array from the parsed JSON input provided by
OpenAI (from the Parse JSON node).
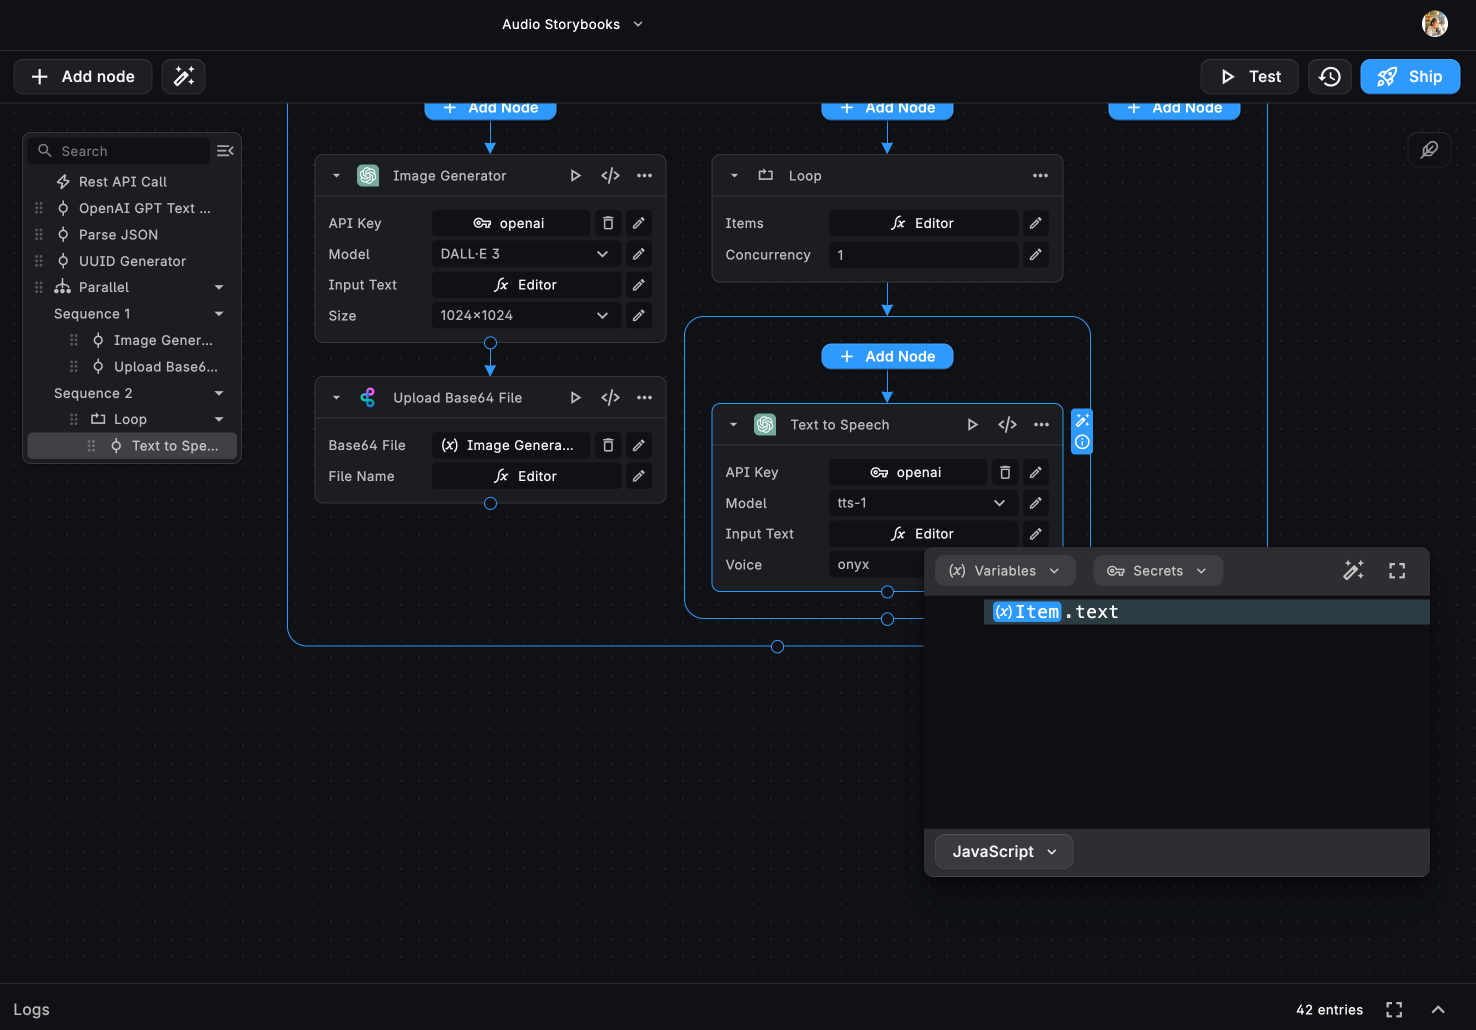
CONVERT TEXT TO SPEECH
Now, within the loop, we need to add the OpenAI Text to Speech node which will convert the story pages into audio page by page with every iteration.
Add in the API Key and pick a model. The Input Text is the text for the current iteration page, i.e. item.text .
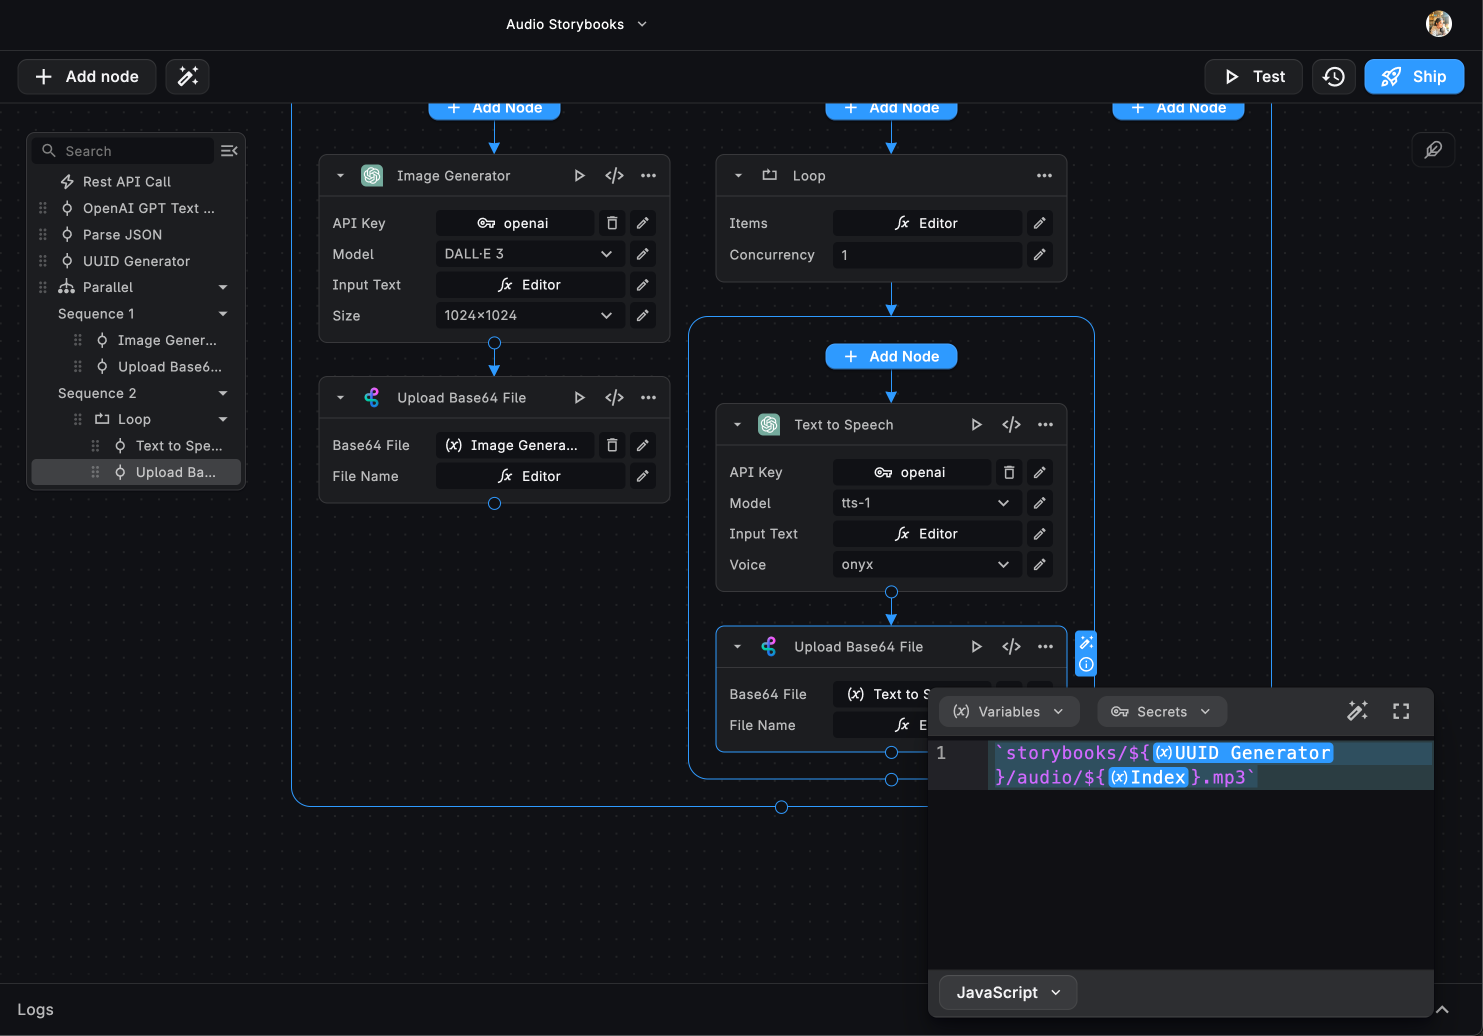
SAVING THE AUDIO FILE TO STORAGE
Once one iteration of the loop generates the audio it will output a Base64 file which we need to save to the BuildShip storage. So, the audio file generated in every iteration is collected in a folder to be combined later.
The Base64 File will be the output generated by the Text to Speech node for that iteration. Let’s set the File Path to:
Step 6: Formatting pages for the Storybook
All we need to do now is to combine all of our generated data together. For this, we do not already have a pre-built node in the library, so let’s create it using the “Generate with AI” feature.
Take the following prompt for example:
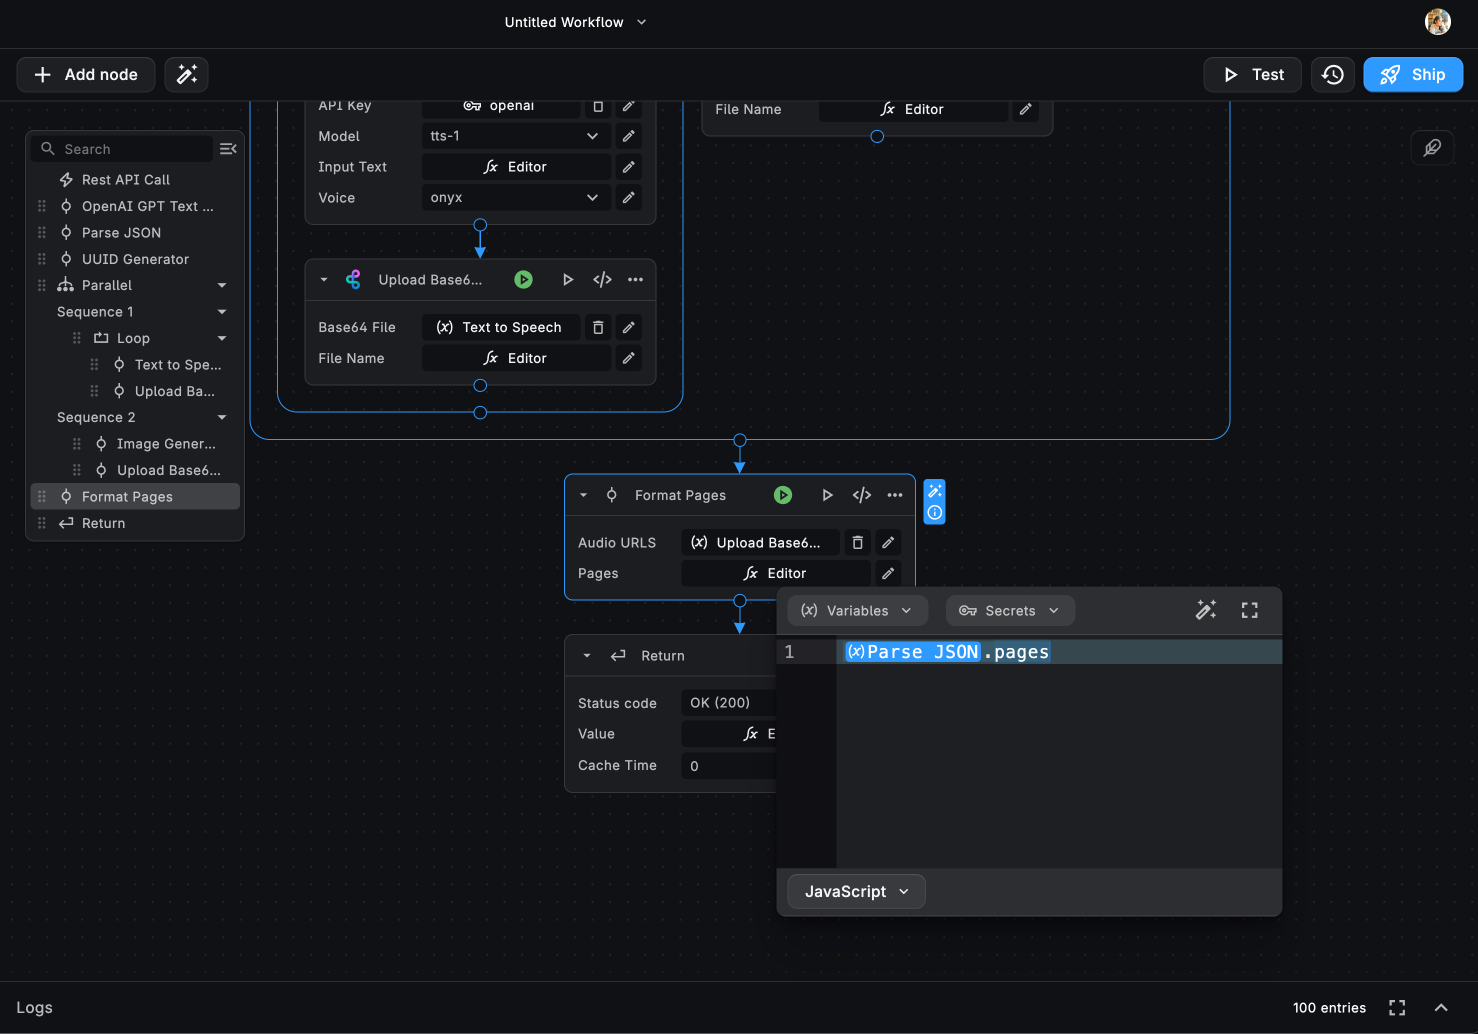
I need a node that takes audioUrls array and pages array as input. It should iterate over the audioUrls array and, for each index, create a JSON object with properties
- index
- audio (value should be the audioUrl at the current index)
- text (the text in the pages array at the same index)
For the Audio URLs add in the output from the Loop node, and for Pages add the ParseJSON.pages as shown in
the Image below.
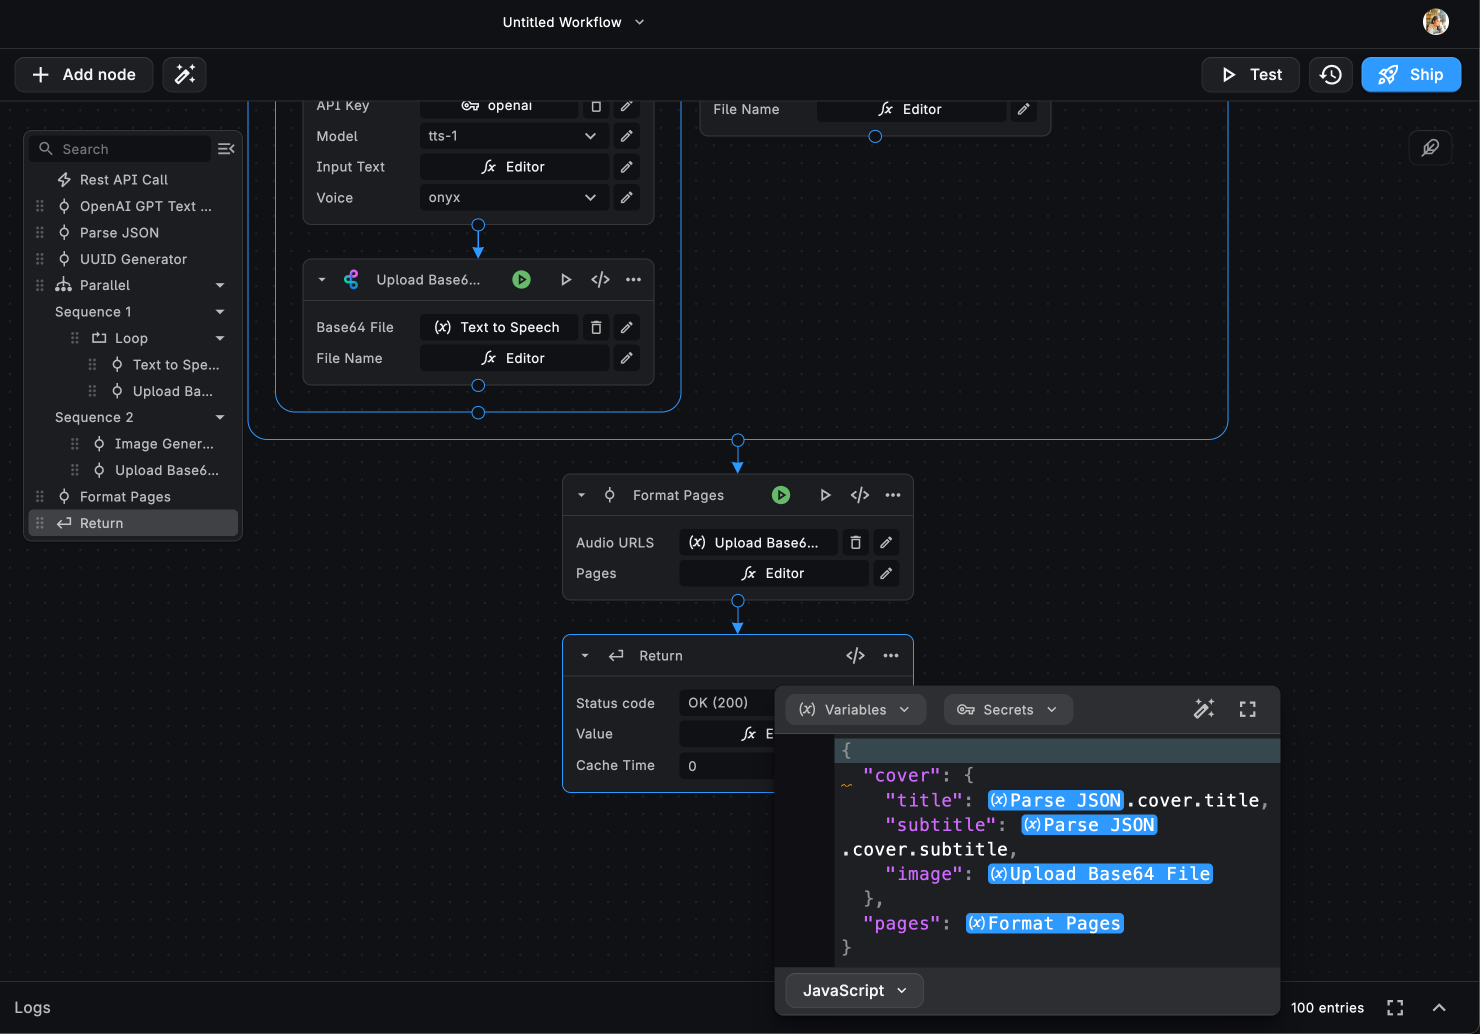
Now, we can test the workflow and see if everything is working as expected and return the output as shown below:
How to test an API?
Now that we have built our workflow, let’s test it out. We can test the workflow by clicking on the “Test” button on the top right corner of the canvas.
You can add in the Request inputs - Query Params, Headers, and Body. For this example, we'd only require the Body. Let's add the following:
{
  "prompt": "Two siblings discover the hidden mysteries of an enchanted garden",
  "style": "Brothers Grimm"
}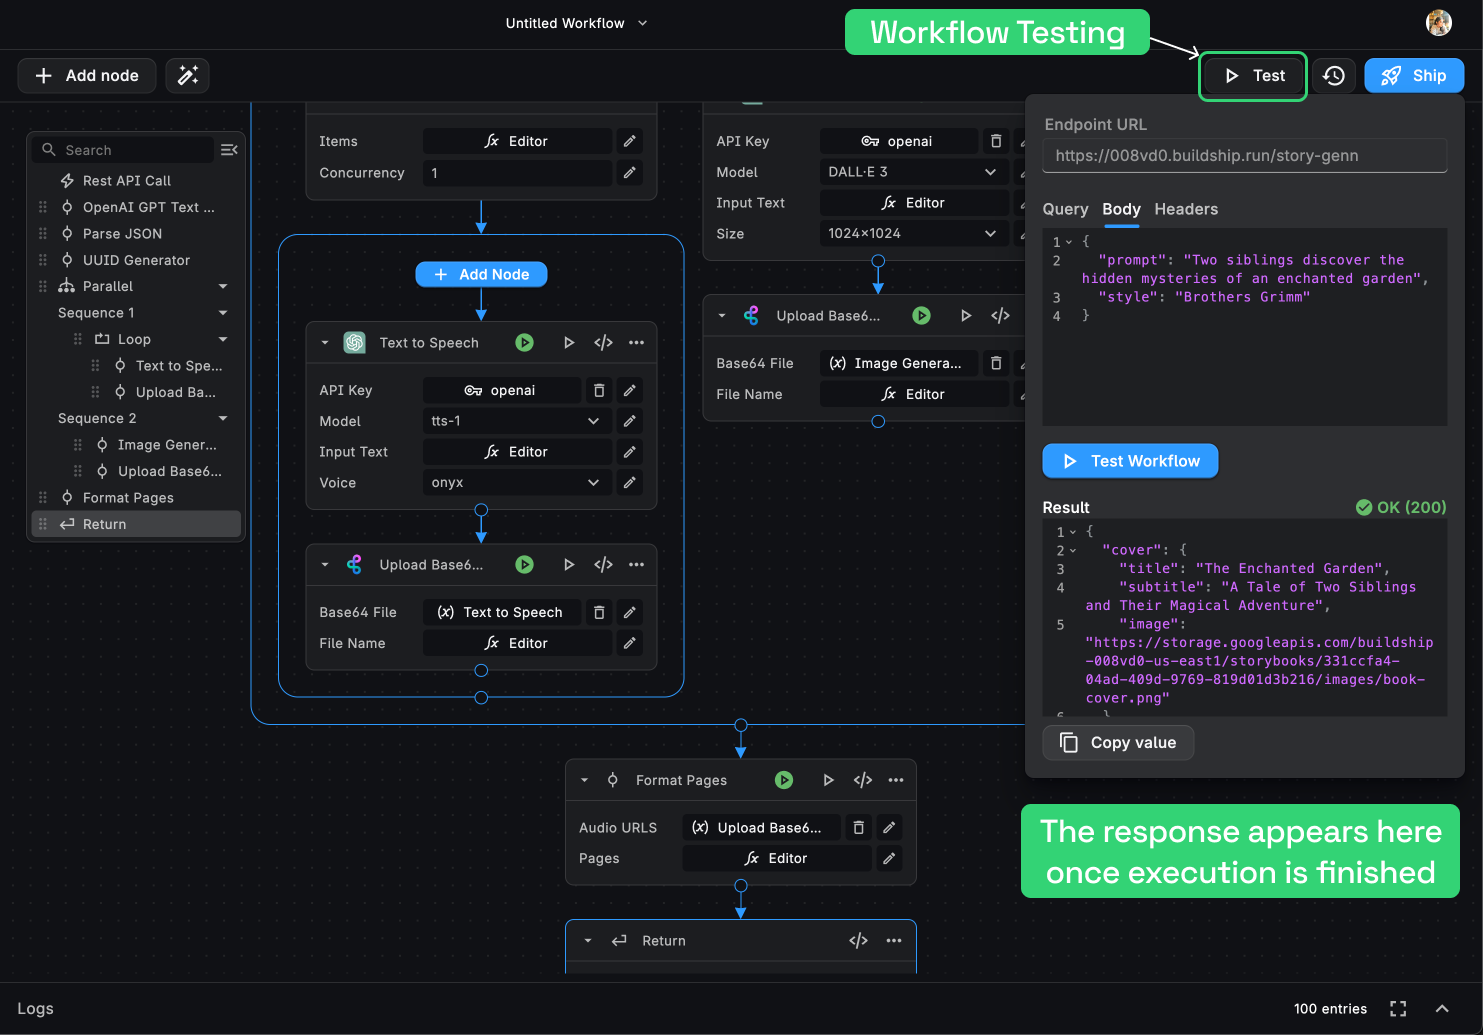
Now, let’s click on the “Run” button to run the workflow. We can see the workflow running in real-time and the output being generated.
For every successful execution of a node, we can see a green tick mark. For any failed execution, we can see a red cross mark. We can also see the output generated by each node by clicking on the mark.
How to ship an API?
Now that we have built and tested our API, let’s ship it. We can ship our API by clicking on the “Ship” button on the top right corner of the canvas.
It takes just a few seconds to complete the deployment process. Once the deployment is complete, we can see the API Endpoint URL in the pop-up.
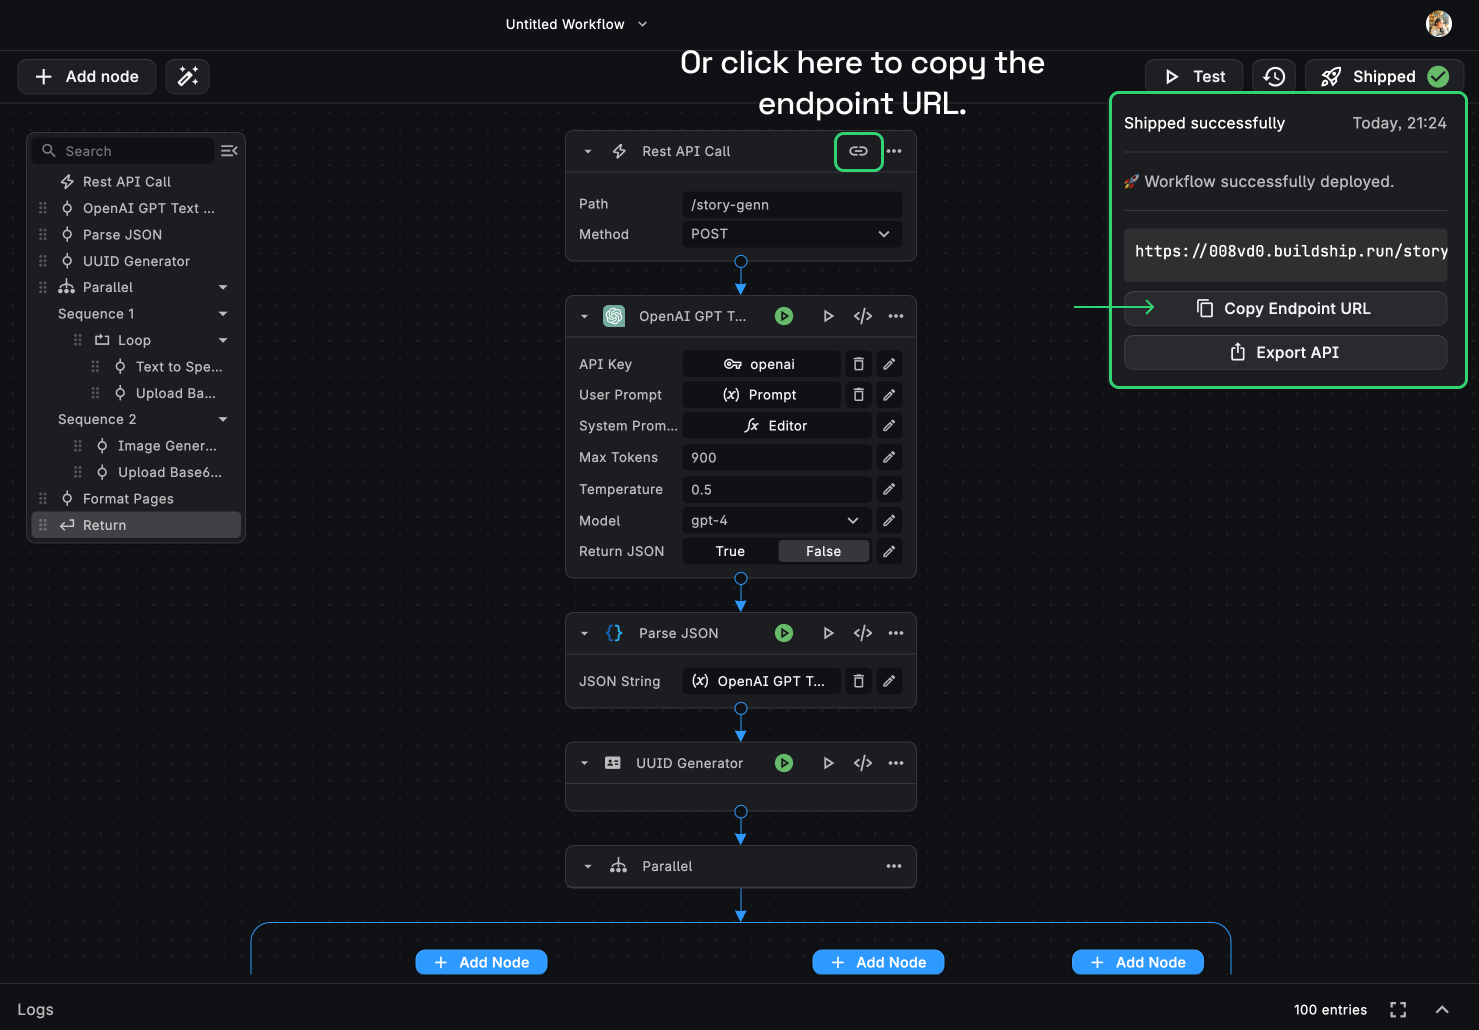
TIP💡: We can also copy the API Endpoint URL from the link icon on top of the REST API Trigger node.
This is the endpoint URL the HTTP request has to be directed to.
The best part is that we can easily perform changes and hit the “Ship” button again to update the API.
The API will not be updated unless the “Ship” button is clicked. Also, any accidental changes made to the API will not be reflected until the “Ship” button is clicked.
Also, every time we ship an API, a new version is created. We can see all the versions of the API in the “Version History” tab next to the Ship Button. (This is only available for paid plans)
How to use an API?
Now that we have shipped our API, let’s see how we can use it. We can use the API Endpoint URL in any of our apps, be it a low-code app or a custom app.
All we need to do is hit the API Endpoint URL with the required inputs. You can pick any programming language, HTTP library or framework to make the API call.
Common choices include requests in Python, axios in JavaScript, or libraries in other languages. For testing purposes, you can use Postman (opens in a new tab), HoppScotch (opens in a new tab) or Insomnia (opens in a new tab).
Making API requests
Use the chosen HTTP library to make requests to the API endpoints. Include any required parameters, headers, and authentication tokens.
Example in Python using requests:
import requests

url = "https://xyz.buildship.run/post_endpoint"
headers = {"Content-Type": "application/json", "Authorization": "Bearer YOUR_API_KEY"}

# Dummy data
data = {
    "name": "John Doe",
    "email": "john.doe@example.com",
    "age": 30
}

# Making a POST request
response = requests.post(url, json=data, headers=headers)

# Handling the response
if response.status_code == 201:  # Assuming a successful creation status code
    result = response.json()
    print("Post successful. Result:", result)
else:
    print(f"Error: {response.status_code}")
Example in JavaScript using axios:
const axios = require('axios');

const url = 'https://xyz.buildship.run/post_endpoint';
const headers = {
  'Content-Type': 'application/json',
  Authorization: 'Bearer YOUR_API_KEY',
};

// Dummy data
const data = {
  name: 'John Doe',
  email: 'john.doe@example.com',
  age: 30,
};

// Making a POST request with axios
axios
  .post(url, data, { headers })
  .then((response) => {
    console.log('Post successful. Result:', response.data);
  })
  .catch((error) => {
    console.error('Error:', error.message);
  });
Example in JavaScript using fetch:
const url = 'https://xyz.buildship.run/post_endpoint';
const headers = {
  'Content-Type': 'application/json',
  Authorization: 'Bearer YOUR_API_KEY',
};

// Dummy data
const data = {
  name: 'John Doe',
  email: 'john.doe@example.com',
  age: 30,
};

// Making a POST request with fetch
fetch(url, {
  method: 'POST',
  headers: headers,
  body: JSON.stringify(data),
})
  .then((response) => {
    if (!response.ok) {
      throw new Error(`HTTP error! Status: ${response.status}`);
    }
    return response.json();
  })
  .then((result) => {
    console.log('Post successful. Result:', result);
  })
  .catch((error) => {
    console.error('Error:', error.message);
  });
Need Help?
- 💬Join BuildShip Community
An active and large community of no-code / low-code builders. Ask questions, share feedback, showcase your project and connect with other BuildShip enthusiasts.
- 🙋Hire a BuildShip Expert
Need personalized help to build your product fast? Browse and hire from a range of independent freelancers, agencies and builders - all well versed with BuildShip.
- 🛟Send a Support Request
Got a specific question on your workflows / project or want to report a bug? Send a us a request using the "Support" button directly from your BuildShip Dashboard.
- ⭐️Feature Request
Something missing in BuildShip for you? Share on the #FeatureRequest channel on Discord. Also browse and cast your votes on other feature requests.