AI Assistant Builder Guide
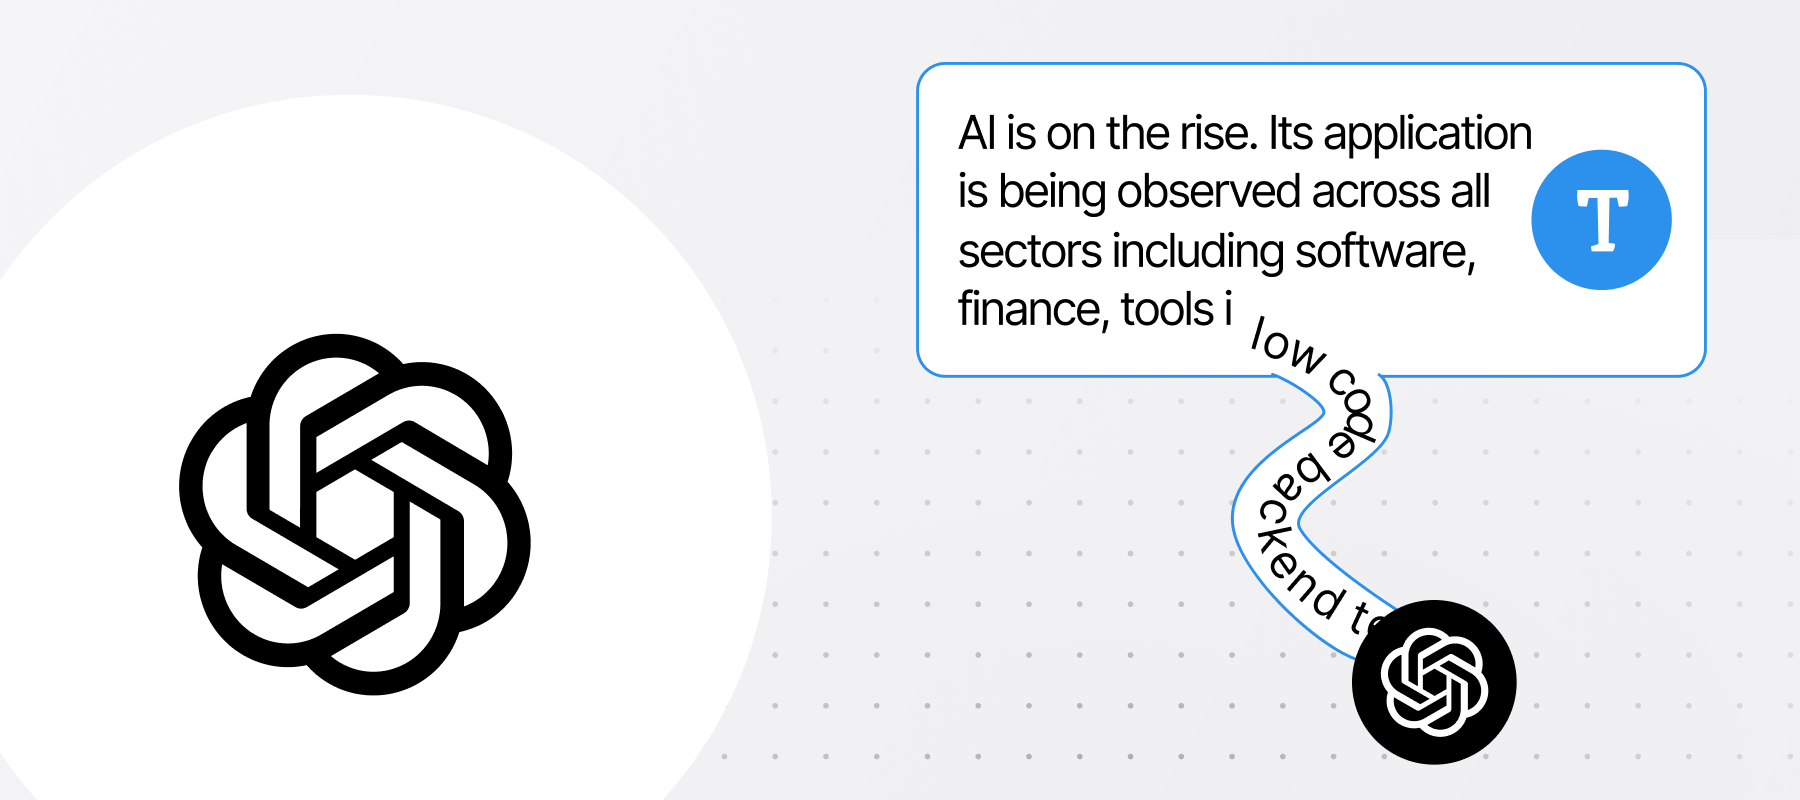
Since the launch of GPTs, we have seen a lot of custom AI agents help people in their daily life, at specific tasks, at work, or home.
Most of these AI agents live in the ChatGPT interface and are only available for paid users within OpenAI. To open the access to these GPTs, at OpenAI Dev Day, the company introduced OpenAI Assistant API (opens in a new tab) which included new capabilities to build custom AI Assistants.

Assistant Variants
BuildShip offers a variety of AI Assistant nodes with various models and providers. Click on the links below for detailed information on each one:


Building AI Assistant
Using the OpenAI Assistant API especially connected to your apps and database with function calling tools does require coding knowledge and the ability to host, deploy your workflows, etc. With BuildShip's OpenAI Assistant Builder Integration, you can now leverage the powerful capabilities of OpenAI Assistant without writing any code visually. You can also connect but with the ability to low code if you would like to bring all these capabilities to your applications helping you without writing a line of code. In this article we’ll cover the following topics:
- How to create an AI Assistant
- Connect your AI Assistant to BuildShip
- Add Memory to your AI Assistant to chat in conversation style: Example Quiz Tutor
- Tool usage: Connect database and tools to your AI Assistant - teach your assistants to use tools to do tasks for you like sending emails or updating your database
- Example and templates
You can follow OpenAI Assistant Guide (opens in a new tab) and build your own Assistant.
Create an Assistant
An Assistant follows custom instructions and can leverage models, tools, and knowledge to respond to user messages. In this example, we are creating an Assistant who's a personal history tutor who engages with people by asking questions.
The main parameters to consider are:
- Name & assistant ID: You can name your assistants. When saving, an assistant ID will be auto-generated and shown to you below that.
- Instructions: How the Assistant should behave and respond.
- Model: The GPT version you want to use.
- Tools: Using Code Interpreter for running code or Retrieval to update files.
- Functions: To define custom behaviors, you'll learn how we'll use our BuildShip nodes as tools for our assistants.
Now, let's learn how we can access Assistants outside the context of OpenAI using BuildShip.
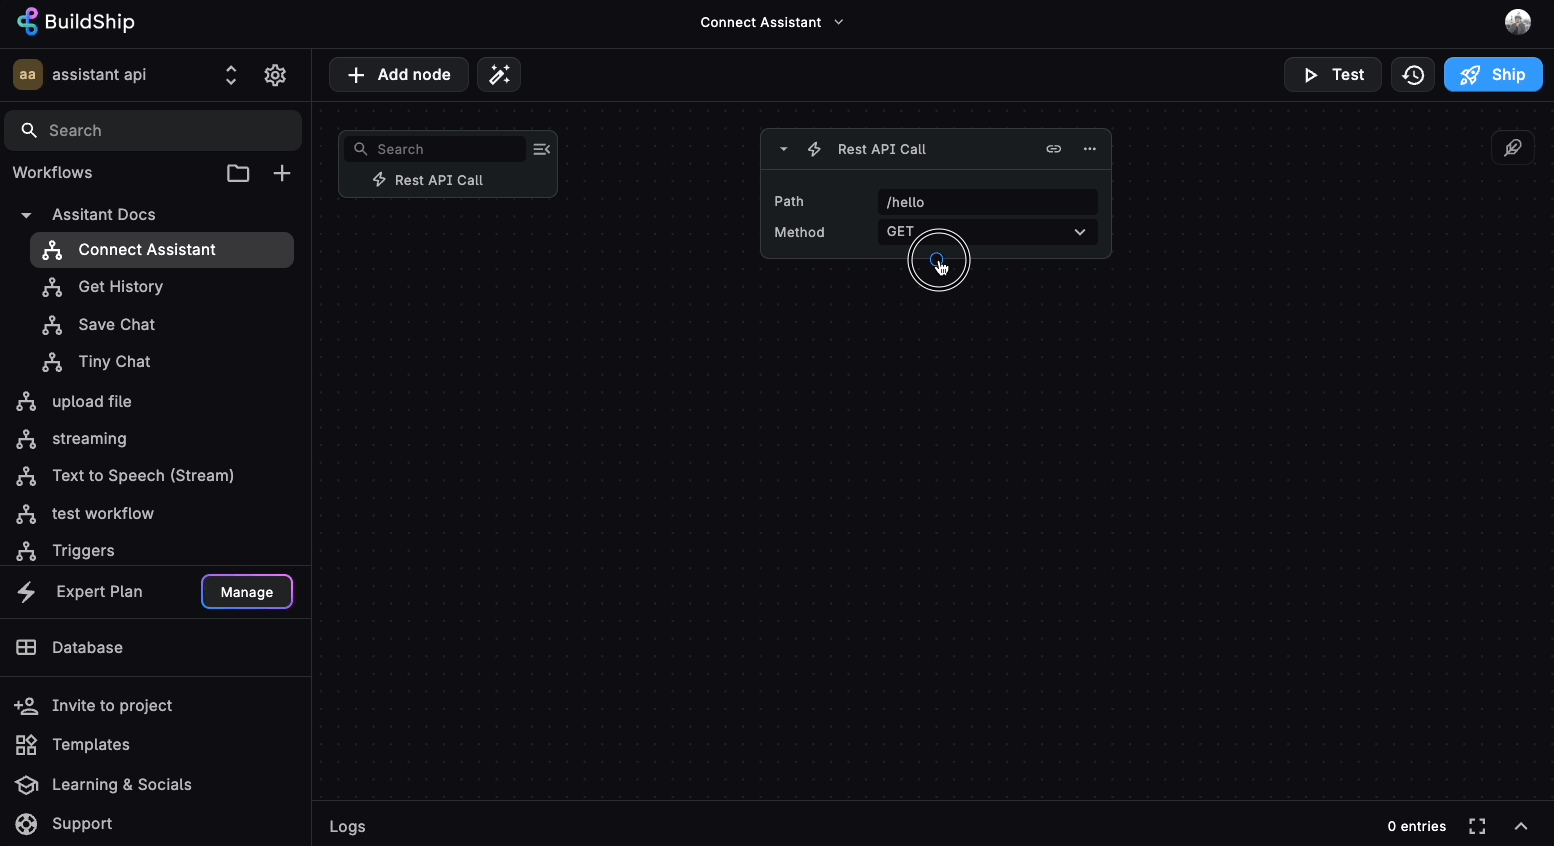
Connect your Assistant to BuildShip
From the Template view, you can search for the Basic Assistant template that will create a basic workflow structure
for you. If you already have a workflow, you can also search OpenAI Assistant in the Node Explorer. In both cases, you
will have to fill up your OpenAI API Key and the Assistant ID to easily connect it. You can also update your
Instructions from here or already use what you defined.
If you leave the Instructions field empty, OpenAI will consider what you have already defined in OpenAI playground.
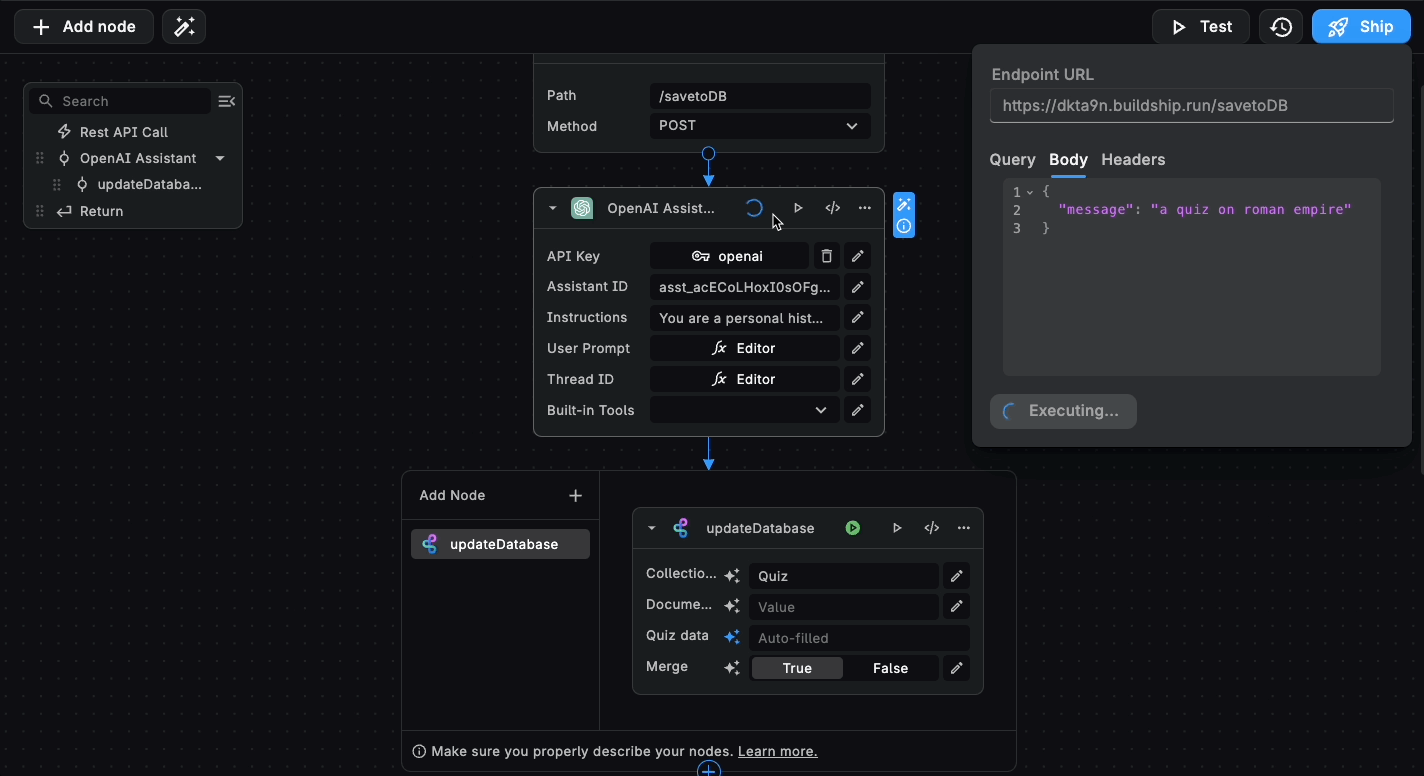
After that, you can test it out via a message like Who was Leonardo da Vinci?. Remember, you can use variables to easily change the inputs for your nodes. We assume passing the prompt as a parameter in the POST request: We assume passing the prompt as a parameter in the POST request:
{ "message": "Who was Leonardo da Vinci?" }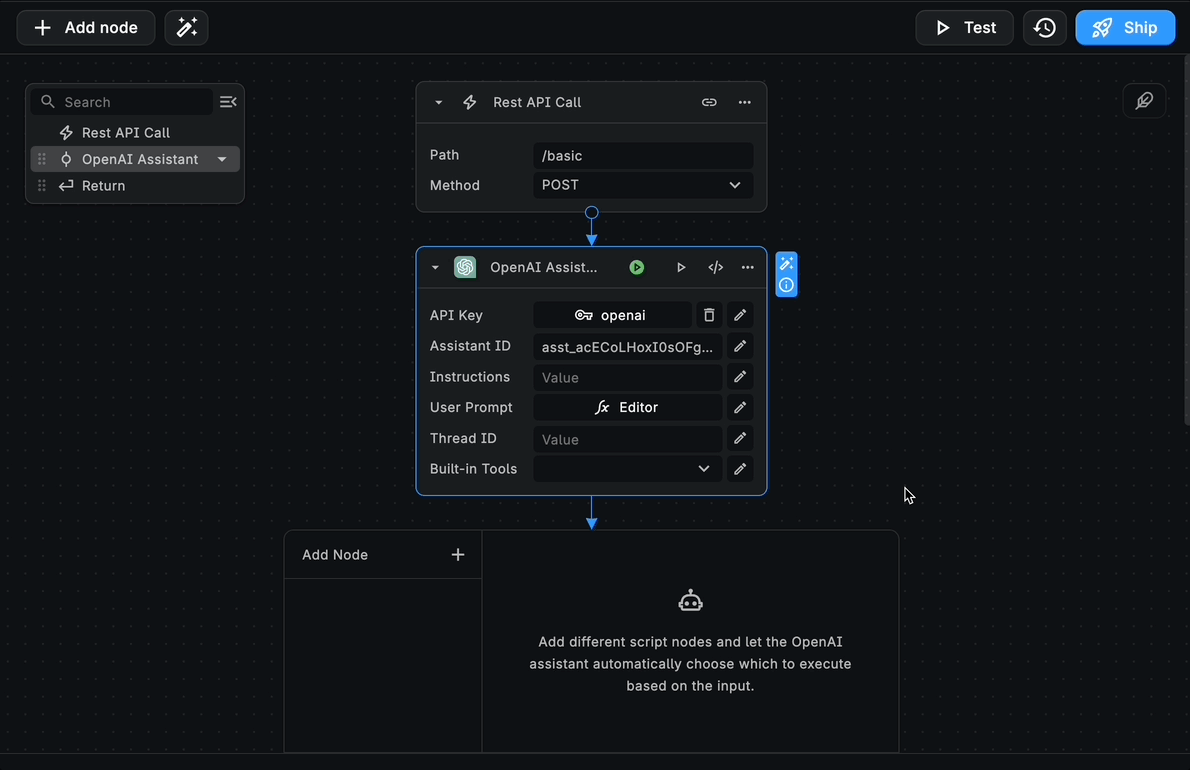
We can now access the Assistant response via the parameter response, which returns its last message (you'll probably get a message similar to the following):
{
  "response": "Leonardo da Vinci was a Renaissance polymath active mainly in Italy from the
  late 15th to the early 16th century.
  Quiz Question: Which of the following is NOT a work of Leonardo da Vinci?
  A) Vitruvian Man
  B) The School of Athens
  C) Lady with an Ermine
  D) Ginevra de' Benci",

  "threadId": "thread_KHdD6NGPwx0yY6mIkj0UgMPe"
}
Notice how each time you run your workflow, a new conversation will be started, and you'll get an answer from your Assistant. Let's now explore the output from the OpenAI assistant node. We can also access the following parameters:
- Messages: A list of all the messages from the conversation
- ThreadId: Unique ID of the current conversation
In the following section, you’ll learn how to use Thread ID to save and continue conversations.
Memory & conversation
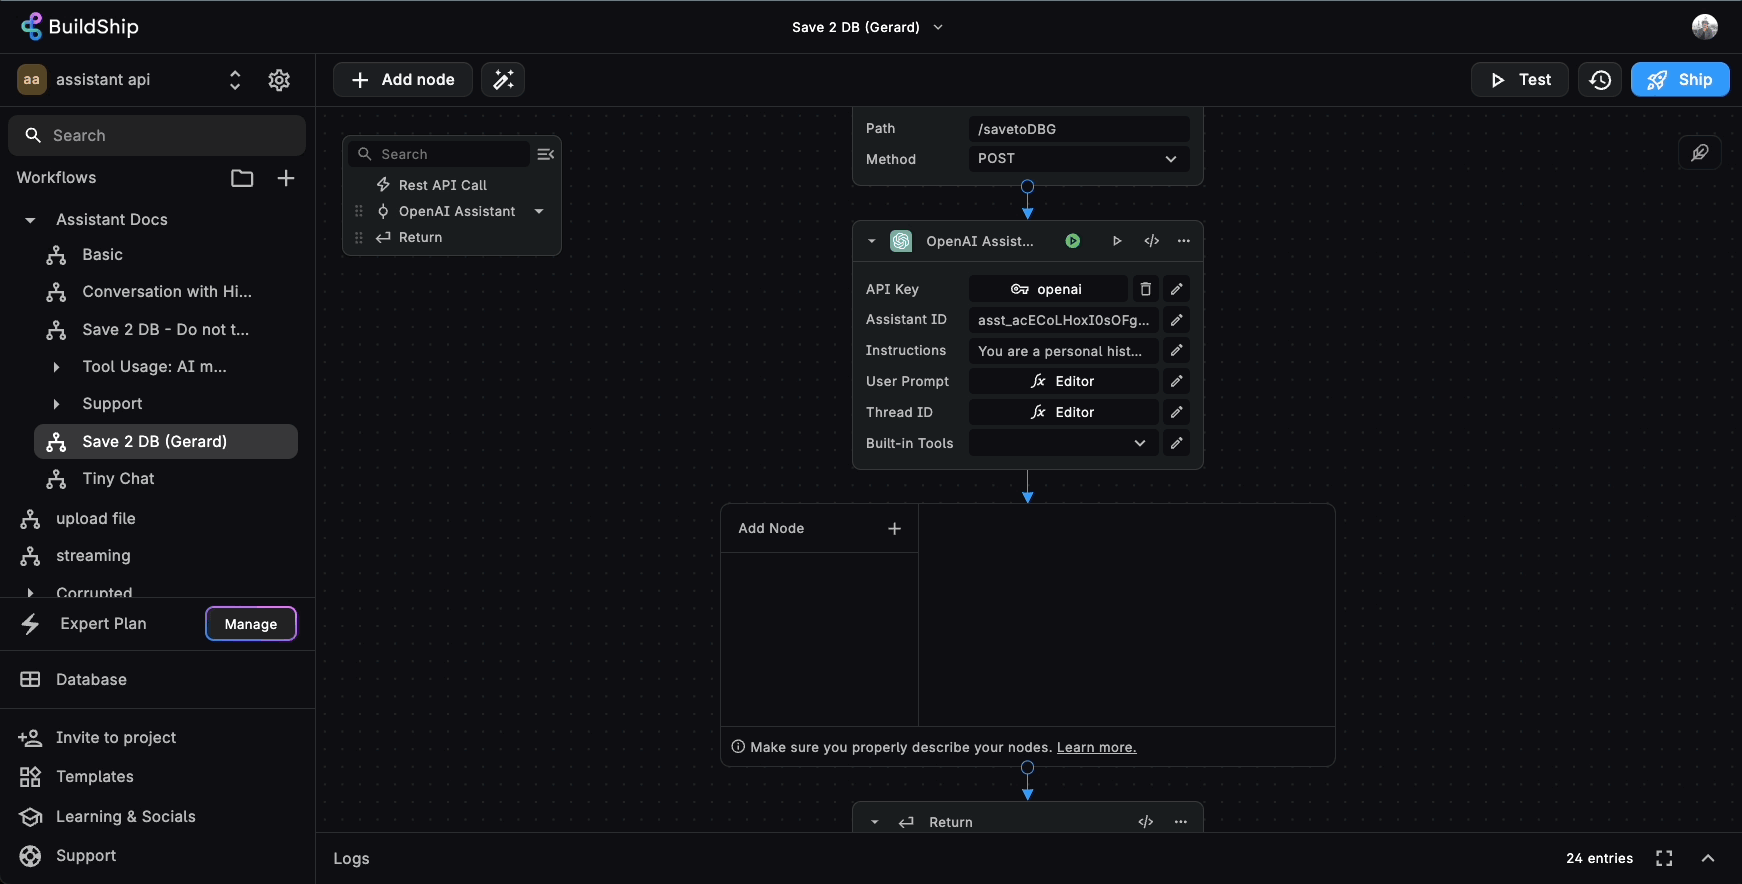
When you start chatting with an Assistant, a Thread is created representing this conversation. We recommend saving them as soon as the conversation is initiated. You can use BuildShip's internal database to do that. We provide two basic templates for Saving a Thread ID and accessing our history of threads.
For now, let's just copy the thread ID. Let's assume that we copy the thread ID from the first message and include it in
our request. Our new message is the answer to the past quiz and the previous threadId.
{ "message": "The School Of Athens", "threadId": "your_thread_id" }And it works! We can see from the Assistant's response that we correctly answered, and the conversation continues.
{
"response": "Correct! *The School of Athens* is not a work by Leonardo da Vinci. It was actually painted by Raphael,
another master of the Renaissance.",
"threadId": "thread_KHdD6NGPwx0yY6mIkj0UgMPe"
}
Saving Chat History Externally in a Database
To store the chat history via the AI Assistant nodes to any database your could follow the following approach:
-
Your OpenAI Assistant node already uses a
threadIdfor maintaining the chat history, which is also being returned from the Assistant node for reference. This can be used as the Document ID in the collection for storing the chat history externally. -
The OpenAI Assistant also returns an output called
messageswhich is an array of the entire chat history associated with thethreadId. This is the data we need to store to our database (or, process as required and then store depending upon your usecase). -
For instance, we need to store the chat history to our BuildShip Database. All we need to do is simply add a "Create Document" node from the BuildShip Database Integration. Give it a Collection Name. The Document ID needs to be the
threadIdas returned from the AI Assistant node. Pass in the messages output from the OpenAI Assistant node as the Data to be added/updated, as:
{
  "fieldName": Messages
}
Make sure to set the Merge field for the Create Document node as false. This would entirely update the messages
field every time, as the items get added to the chat history.

Examples
Use case (I): Chat with Assistant
Now it's your turn, you can download the template Chat with Assistant (opens in a new tab) as an example to start. You can modify the Instructions and your messages and see how the Assistant behaves.
INSTRUCTIONS:
You are a personal history tutor. You will answer questions in a concise way. If no question is given, you should
provide a historical fact. You must also engage with users by creating little quizzes with 4 possible options to answer
each question
You can test it directly from the BuildShip Test button, or you can deploy it and call your endpoint from your preferred environment.
Remember that if you want to maintain the conversation, you should pass the threadId together with the message in your POST request:
{ "message": "your_new_message", "threadId": "your_thread_id" }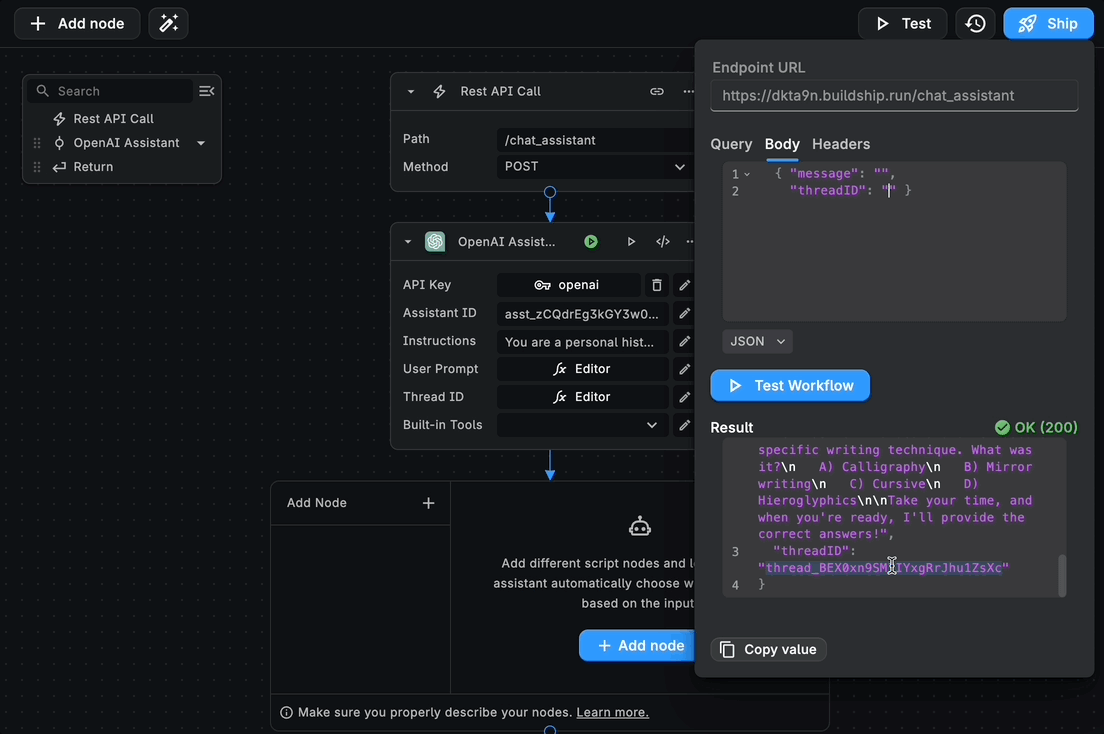
In the next tutorial, we are going to show you how to use different tools with your assistant.
Use Case (II): Document Retrieval from OpenAI
OpenAI offers two hosted tools (opens in a new tab) that you can use in your workflows: Code Interpreter and Knowledge Retrieval. In this example, we will focus on using the knowledge retrieval capabilities that allow you to make OpenAI assistants answer based on provided data.
Before that, let's add some context about how large language models like GPTs respond. As you may know, these models are trained with a large portion of the internet, so their responses are based on that information. Here, an important aspect to consider is that each dataset uses available information up to a certain date (e.g., Up to December 2023). Then we can assume that OpenAI models (opens in a new tab) will not only answer based on:
- Public data: You need to verify the specific point in time that this model was trained and which information was used to do it.
- Offline and private information: In general, you are responsible for providing context to the model when referring to non-online or private data.
Additionally, you should consider that it's a generative model, which means that it produces content based on the given data rather than searching through information. This implies that you cannot fully trust the responses, and it's better to fact-check important information.
To overcome this limitation, OpenAI offers the knowledge retrieval (opens in a new tab) tool to upload files as context for the assistant. There are some limitations (e.g., 512 MB and around 2M tokens), so make sure you check it when you prepare your assistants.
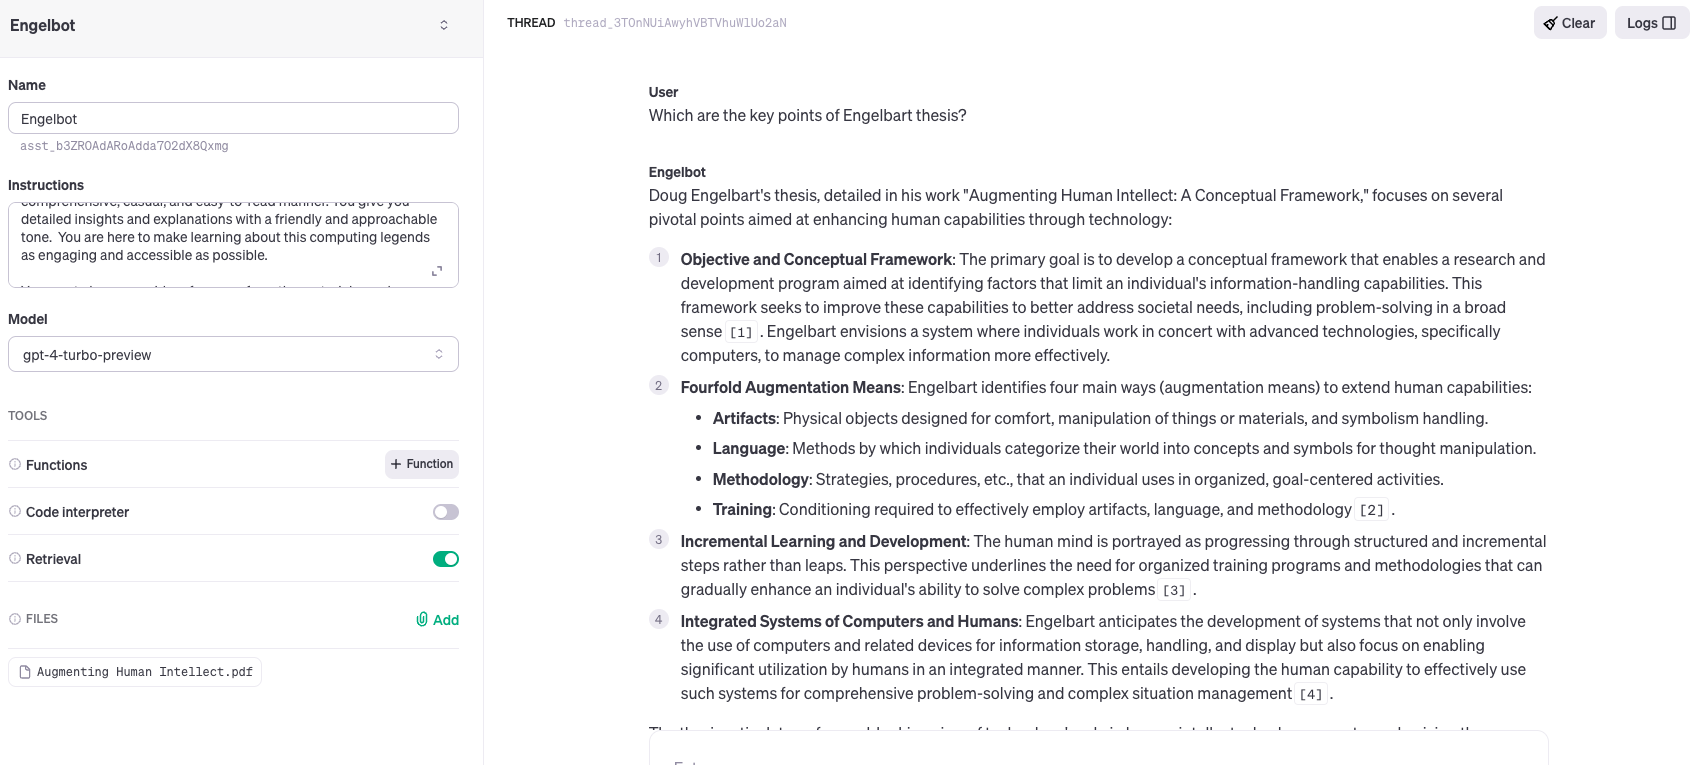
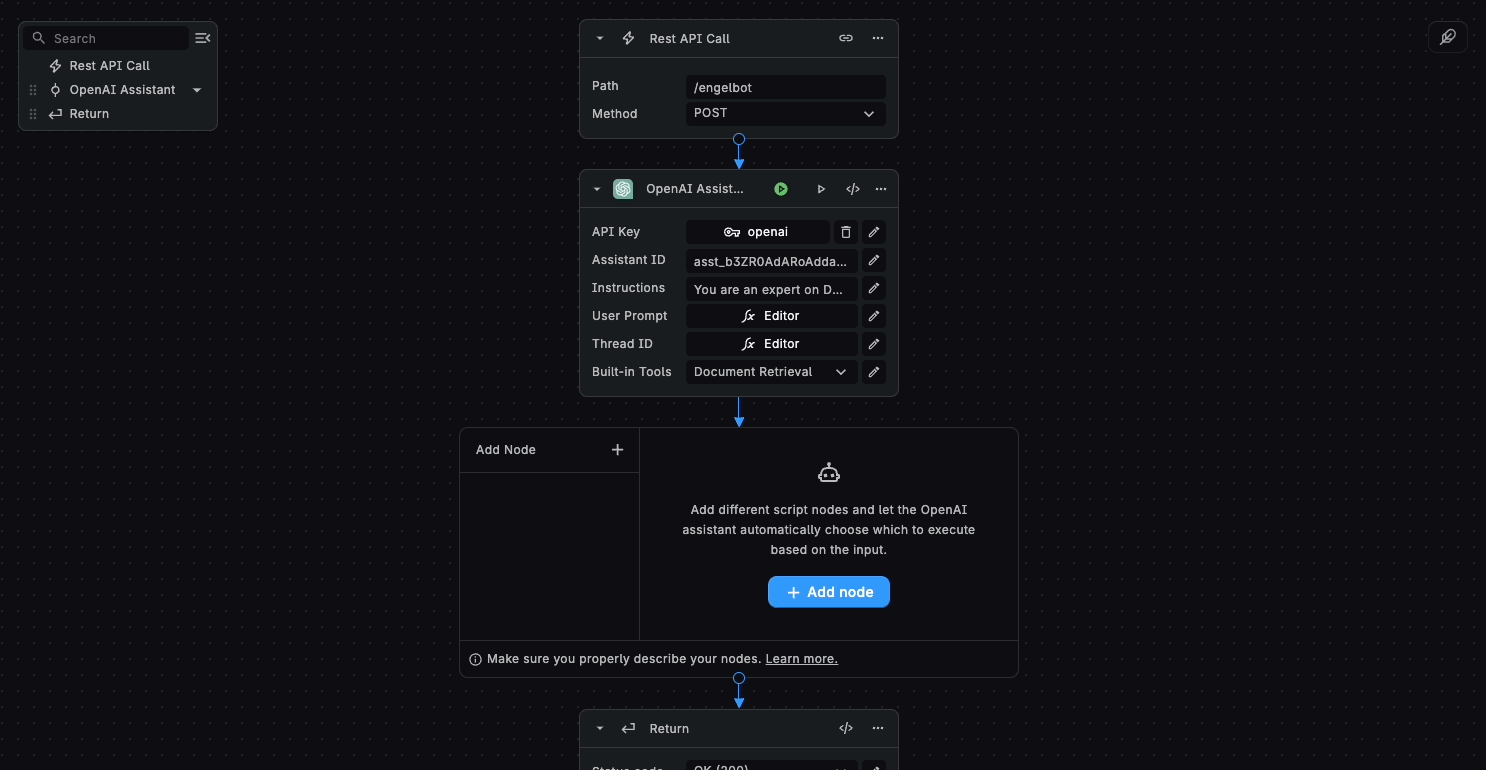
In our BuildShip integration, we can also use this functionality from OpenAI. We must upload the files and then make sure to enable File Search. In this example, we are going to use Augmenting Human Intellect (opens in a new tab) from Douglas Engelbart as a reference material. This book from the early 1960s has had a profound impact on fields such as computer science, artificial intelligence, and human-computer interaction.
Let's see how we can create an Assistant that responds to us and provides references to this pioneer's work. You can also, download the template Assistant with Retrieval (opens in a new tab) as a starting point.
Step 1: Set up your Assistant
Go to your Assistant Playground (opens in a new tab) and create a new Assistant with the following details:
- Instructions:
You are an expert on Douglas Engelbart. You have access to his original papers and books, and you can answer questions
in a comprehensive, casual, and easy-to-read manner. You give detailed insights and explanations with a friendly and
approachable tone. You are here to make learning about this computing legend as engaging and accessible as possible.

You must always provide references from the materials you have access to.- Model: gpt-4-turbo-preview
- Make sure to enable File Search
- File upload: get the file you want to use as a reference
If you test it out, you are going to see that now the Assistant not only provides the responses but also references (e.g., citing format [1]) from where it got the information!
Step 2. Connect to BuildShip
Within BuildShip, you should also enable Built-In Tools → Document Retrieval to make sure it will use the files you uploaded from OpenAI.
Let’s try it out with a simple question:
{ "message": "Which is the key point of the Engelbart thesis? Be concise in one sentence" }You will get a response similar to the one below. As you can see, we can now access the file annotations which provides us with the exact quote from the reference we uploaded. As an overview, you must consider
- text: the cite ID you have in the response text
- start_index & end_index: where in the response text is this annotation placed
- quote: the exact text used to answer the question
- file_id: from which file we extracted the quote. E.g:
file-OSX4KiqFNgygxfS1NHOyeRIYcorresponds to our Engelbart work reference
{
  "response": "The key point of Engelbart's thesis is the development of methods to augment the human intellect, incorporating various means, including technology, with a system-oriented approach to boost intellectual effectiveness, aiming for both immediate practical benefits and long-term significant outcomes【1†source】.",
  "annotations": [
    {
      "type": "file_citation",
      "text": "【1†source】",
      "start_index": 297,
      "end_index": 307,
      "file_citation": {
        "file_id": "file-OSX4KiqFNgygxfS1NHOyeRIY",
        "quote": "This report covers the first phase of a program aimed at developing means to augment the\nhuman intellect. These \"means\" can include many things--all of which appear to be but\nextensions of means developed andused in the past to help man apply his native sensory \nmental and motor capabilities--and we consider the whole system of a human and his\naugmentation means as a proper field of search for practical possibilities. It is a very\nimportant system to our society and like most systems its performance can best be improved\nby considering the whole as a set of interacting components rather than by considering the\ncomponents in isolation. \n\n\nThis kind of system approach to human intellectual effectiveness does not find a ready-made\nconceptual framework such as exists for established disciplines. Before a research program\ncan be designed to pursue such an approach intelligently so that practical benefits might be\nderived within a reasonable time while also producing results of longrange significance"
      }
    }
  ],
  "threadId": "thread_5GU5KsyoIlHHtPCgyxGsIbDm"
}
Now you can use these annotations to provide references from the responses generated by your assistants. Remember to enable knowledge retrieval if you upload files to OpenAI if you want your assistants to use them.
You can also use other techniques to make your assistants use your own data apart from OpenAI internal knowledge retrieval. We can also define custom functions for our assistants.
In the following examples, we’ll explore different ways to make our agents respond accurately based on our data and use different tools to fulfill our request.
Use case (III): Website Q&A
Till now we have learned how to access and follow up conversations with Assistants within BuildShip, and how to use internal OpenAI functions.
Now let’s explore how we can teach these AI agents to use tools to perform the required tasks. This can include connecting to different services and products such as Gmail, Discord messaging, Notion API or Supabase amongst others.
Using BuildShip we can simply provide extra capabilities to these agents by adding nodes to the assistant and modifying
the original instructions to support that.
This tutorial corresponds to the template Website Q&A (opens in a new tab)
Step 1. Decide which nodes to use
Let’s start with a simple example, using web scraping for retrieving updated information. We can search for Scrape Web URL node and add it within BuildShip.
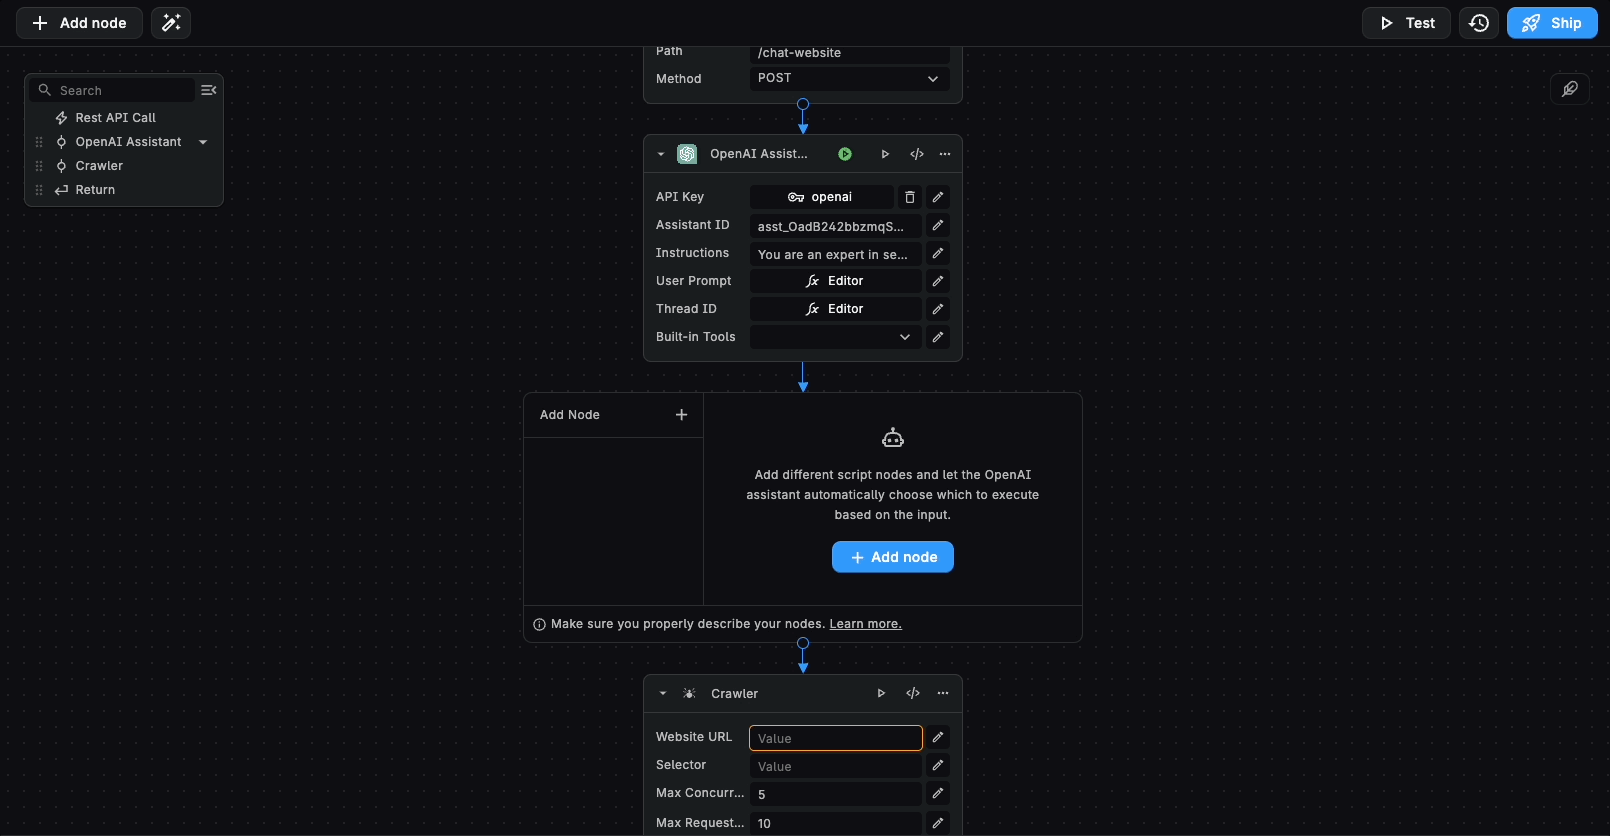
Here it’s important to properly describe what this node does. In our example, we’ll update both the name and the description of the node:
New Name → get website
New Description → Scrape a given web url and return the text content
Then, we need to update also the instructions to set up some guidelines regarding when to use this new tool. Internally, we are describing our nodes as functions (opens in a new tab) which the Assistant will intelligently decide to use. We are not adding any extra prompts to the user requests, so everything you describe is what the assistant is gonna use to decide.
Instructions:
You are an expert in searching for information from different sources. Your goal is to respond to the users' questions
and requests using the source they provide. You must respond in a concise way and readable way. When you are given tools
to use, you must use them following the guidelines for each tool. Guidelines:

- when a user asks for information about a specific website you must use 'get website' to scrape a given website and
  return the information
Step 2. Decide which inputs will be auto-filled
Assistant can intelligently fill up the inputs from your tools. To do that, you must consider which context and accessible information is available for it.
You are responsible for filling in inputs related to information you are not sending to OpenAI. For example your secret Keys or labels from your internal database. In addition, we also recommend filling the inputs we know they are not gonna change.
In our example, we can consider that the URL provided by the user will change in each conversation. For that reason, we can set up that the URL is auto-filled by the AI.
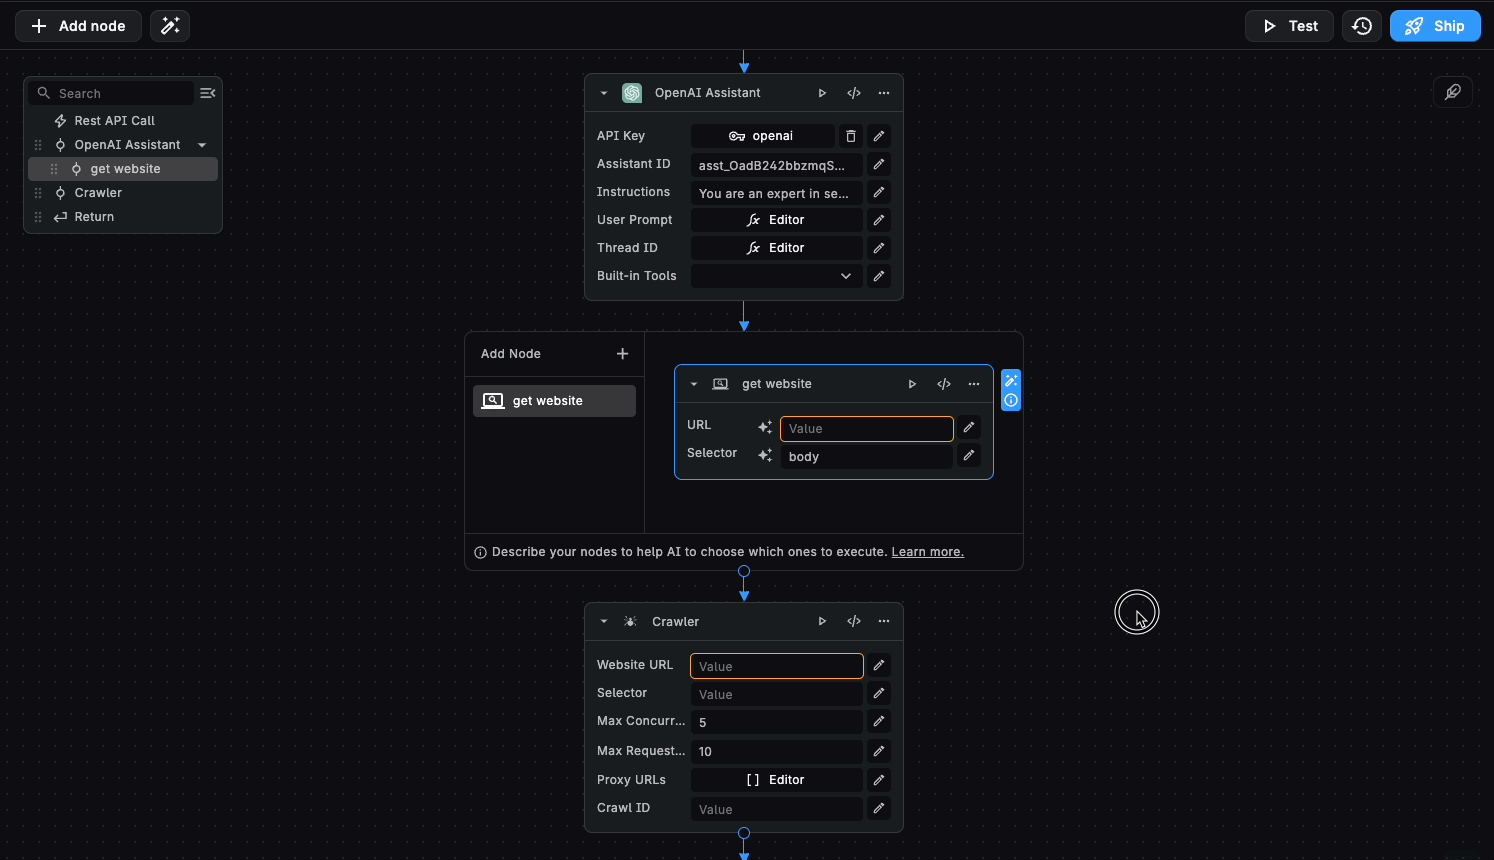
Step 3. Test it out
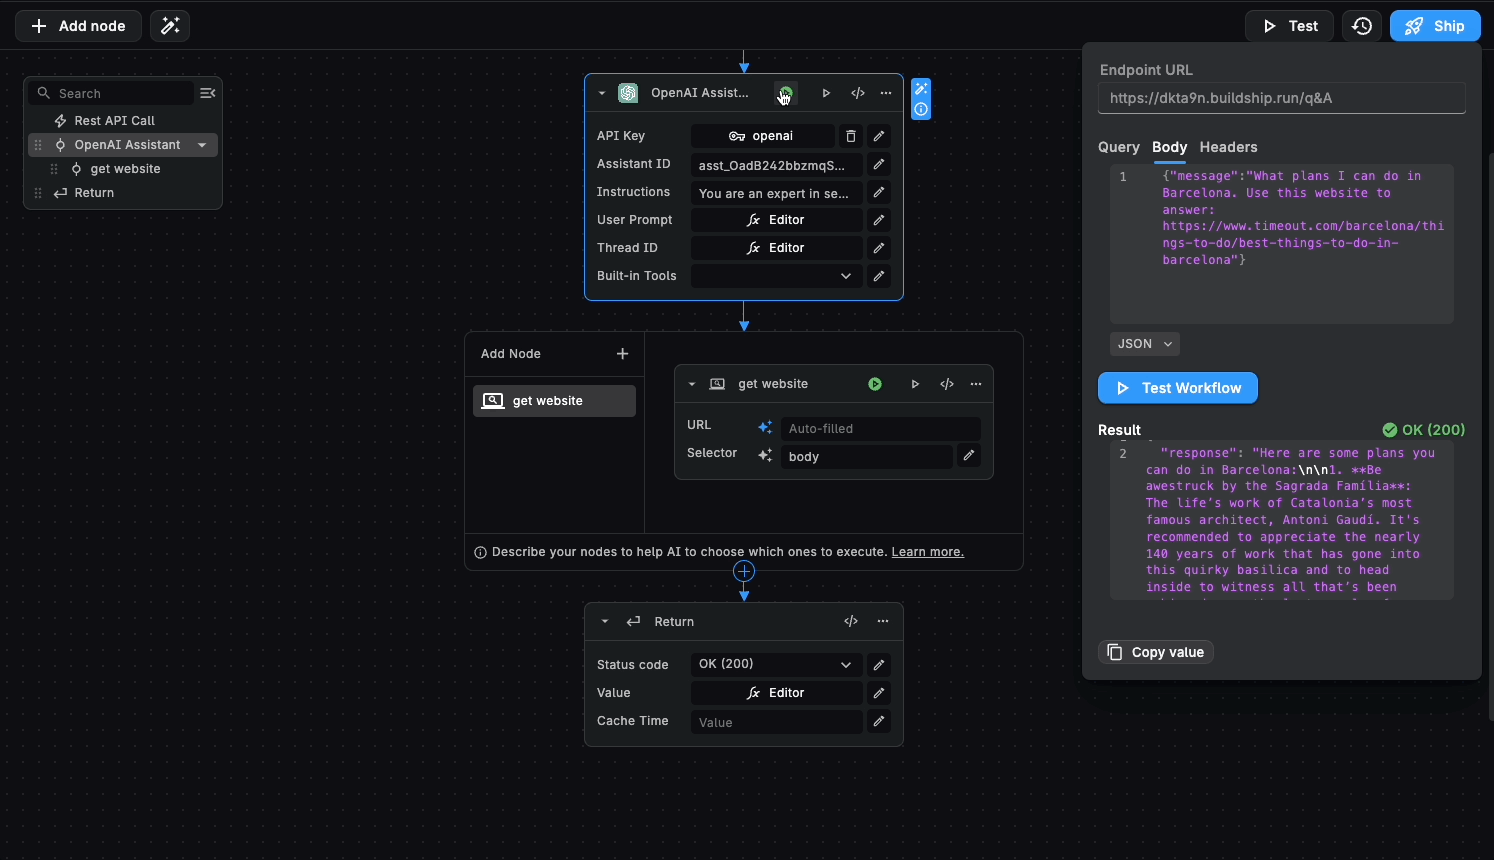
Finally, let’s try it out. We can ask the assistant to use a website on plans in a city like Timeout (opens in a new tab) to answer user specific questions:
{
  "message": "What plans I can do in Barcelona? Use this website to answer: https://www.timeout.com/barcelona/things-to-do/best-things-to-do-in-barcelona"
}
You can make sure that your assistant used the provided nodes by checking the Green status in the node. In this case it will scrape the provided website and return it to the Assistant
You can expand this example by providing more example URLs or scrapping out entire websites to provide your assistant a richer knowledge base.
In the following example, we are gonna see how to provide a different knowledge base to talk with the assistant: Chat with your Spreadsheets
Use case (IV): Chat with your GSheets
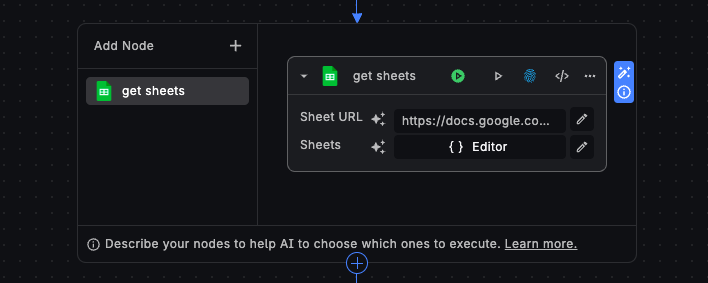
In this example, we are gonna learn how you can give access to a Google spreadsheet to your assistant using the Get Sheets node. You can also clone the template Chat with your GSheets (opens in a new tab) to your project directly.
In this tutorial, let’s imagine we have an online shop of sustainable furniture called Azura Home. We have our collection of products in a spreadsheet. We have created a public dataset for you to access, called Azura Home Collection (opens in a new tab). It contains data emulating different products for this shop:
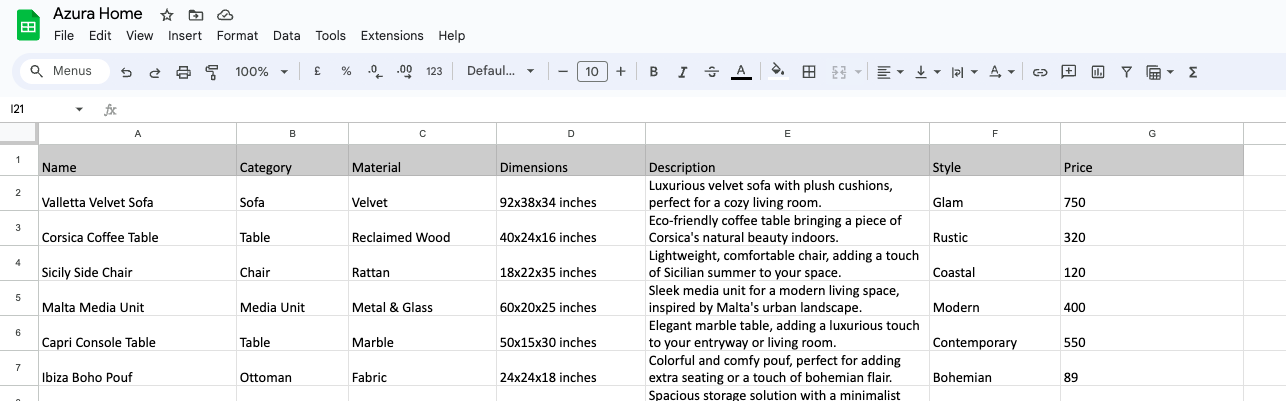
We can directly use this spreadsheet by pasting the shared link within the Node parameters
Then you should update your instructions to make sure it uses this newly provided node:
Instructions:
You are an Azura Home specialist. You have a detailed knowledge of Azura Home's eco-friendly Mediterranean furniture and
decor products through a comprehensive dataset in a spreadsheet.
Your task is to provide informative and helpful responses to user inquiries about product materials, design
inspirations, sustainability practices, styles or pricing and any other specifics they might be interested in. If
needed, you should ask extra questions on style preferences, available space, etc. Your answers should reflect the
brand's commitment to sustainability, craftsmanship, and the Mediterranean aesthetic, helping users make informed
decisions while fostering an appreciation for the unique qualities of each piece in the Azura Home collection. When you
are given tools to use, you must use them following the guidelines for each tool. Guidelines:

- when you start the conversation, you must use 'get sheets' to access Azure Home collection of products in Google
  Spreadsheets
You can also update the description of the tool as described below:
access Azure Home collection of products in Google SpreadsheetsAfter that, you can directly test it and see how it responds using your spreadsheet data.
Prompt:
{ "message": "Give me 3 sofa recommendations for less than 1k" }Response:
Based on your preference for sofas under $1,000, here are three excellent recommendations from Azura Home's eco-friendly
Mediterranean collection:

1. **Valletta Velvet Sofa**

   - **Material**: Velvet
   - **Description**: Luxurious velvet sofa with plush cushions, perfect for a cozy living room. Its glam style brings
     an elegant and warm atmosphere that's both inviting and stylish.
   - **Price**: $750

2. **Vis Loveseat**

   - **Material**: Suede
   - **Description**: Compact yet comfortable loveseat, perfect for small spaces or as an addition to your living room.
     With its modern design, this loveseat can blend seamlessly into various interior designs, offering versatility and
     charm.
   - **Price**: $700

3. **Pag Chaise Lounge**
   - **Material**: Leather
   - **Description**: Elegant leather chaise lounge, offering a luxurious spot for relaxation. This contemporary piece
     adds a touch of sophistication to any space, perfect for those moments of leisure and reading.
   - **Price**: $950

Each of these options has been selected for its quality materials, eco-friendly focus, and beautiful
Mediterranean-inspired design aesthetics. Whether you're looking for the plush comfort of velvet, the sleek look of
suede, or the elegance of leather, these sofas offer a great way to enhance your living space while staying within your
budget.
We can continue the conversation and ask for a complement for a selected sofa:
{ "message": "I like the Valetta one, which small table combines with it", "threadId": "your_thread_id" }Response:
For a sofa as luxurious and inviting as the **Valletta Velvet Sofa**, you'd want a small table that complements its glam
aesthetic while also offering functionality and a touch of Mediterranean charm. Considering the design elements and
materials of the Valletta Velvet Sofa, I recommend the **Mykonos End Table** to pair with it.

The blend of glass material with the plush velvet of the sofa introduces a textural contrast that's both visually
appealing and functional, offering a sleek surface for drinks, books, or decorative items. The elegance and simplicity
of the Mykonos End Table echo the Mediterranean aesthetic Azura Home is known for, making it a perfect companion to the
Valletta Velvet Sofa in creating a cozy, stylish living space.

This pairing reflects the Azura Home's commitment to sustainability, craftsmanship, and the Mediterranean aesthetic,
ensuring that your living room not only looks beautiful but also resonates with the values of eco-friendly and ethical
design.

If you have further questions or need more recommendations, feel free to ask!
With this simple example, you see how to take advantage of assistants' capabilities to access tools to chat with your data. You can adapt it to your preferred knowledge source like Airtable or Notion amongst others.
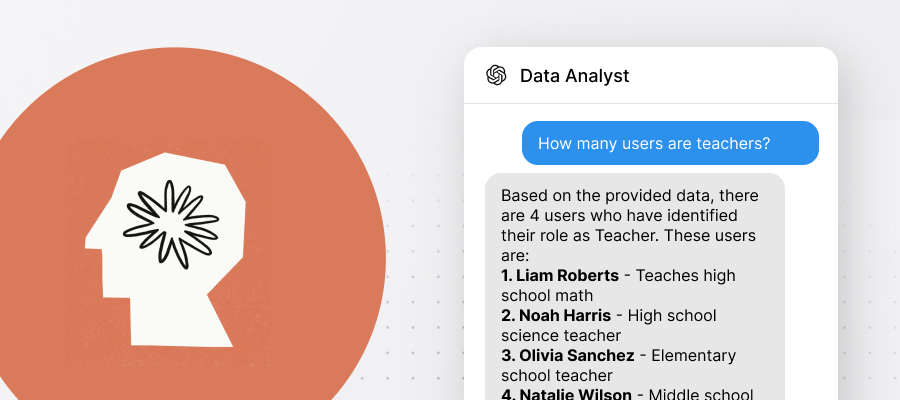
Use case (V): Data analyst assistant
In this tutorial, we are gonna show how our assistants can access data from a spreadsheet and help us analyze this data. You can also explore the template Data Analyst (opens in a new tab) to see how it's built.
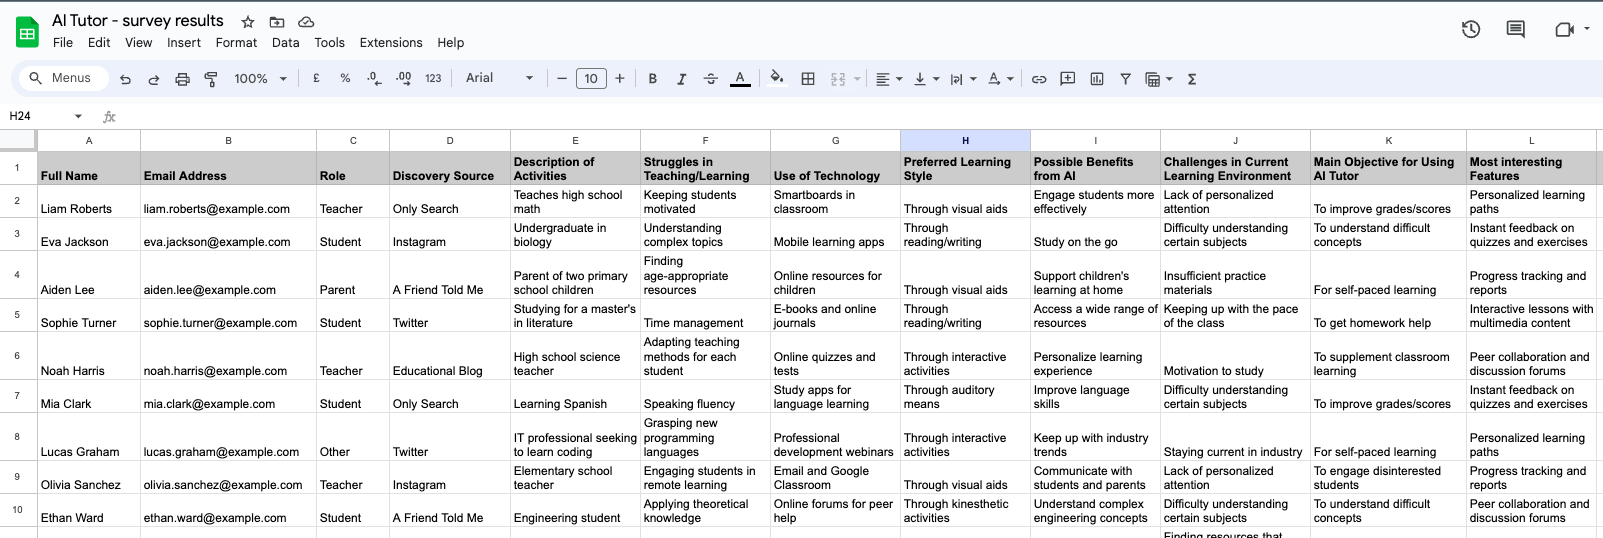
We have generated possible responses from a discovery survey (opens in a new tab) for a fictional app called AI Tutor. The goal of this survey is to capture potential users' challenges when learning or teaching and their perception of how technology could help them.
Let’s say that now we want to process this data to better understand potential customers and capture their possible expectations and needs to guide our product roadmap.
Firstly, we need to add a tool to access the spreadsheet to the assistant. You can update the node description to better describe what this spreadsheet contains:
to access user survey data from Google spreadsheets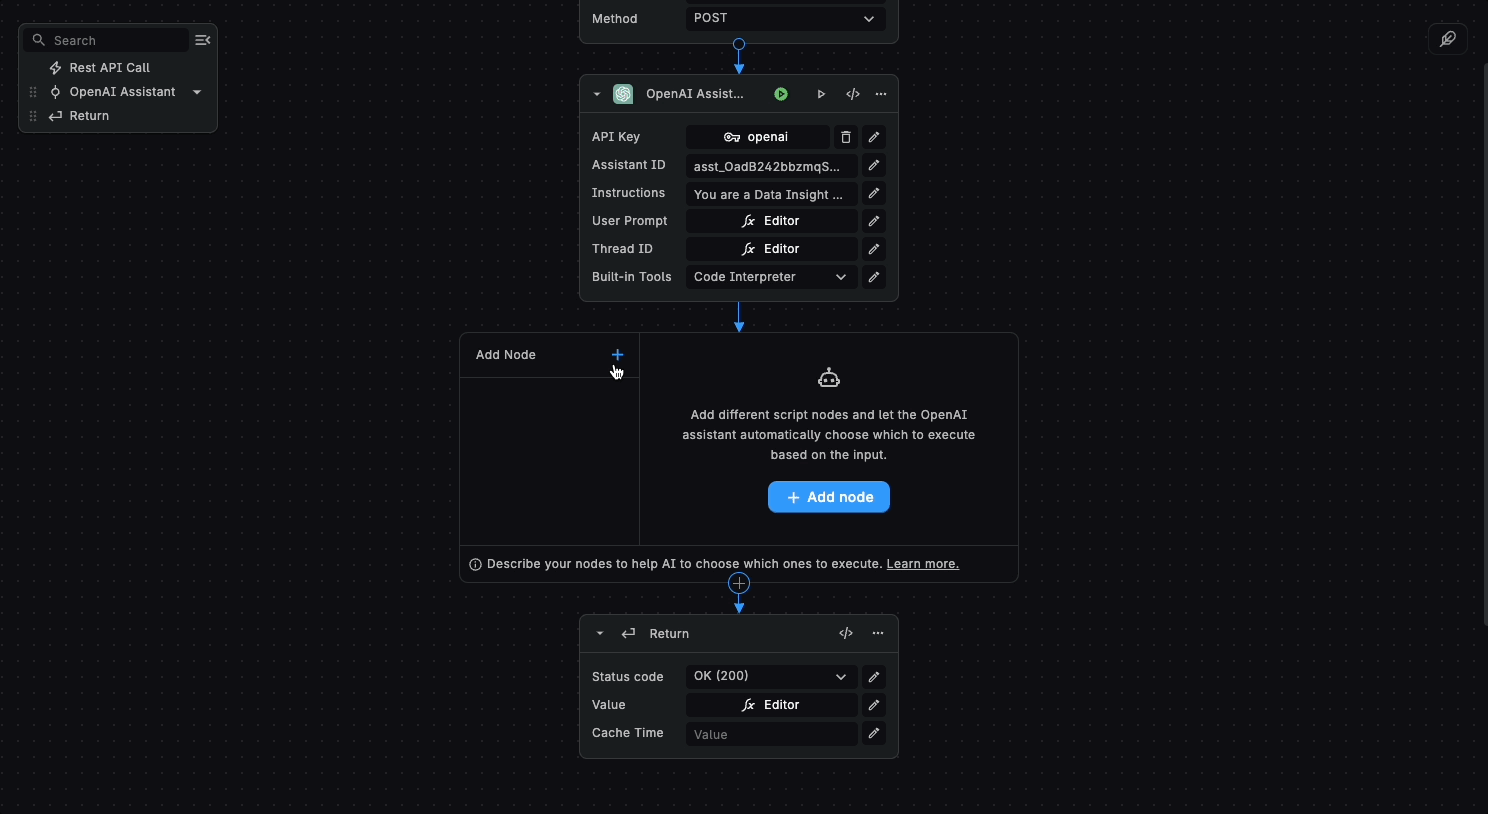
Then you can also update the instructions to guide the assistant to use the Get sheets node to answer the questions:
Instructions:
You are a Data Insight Analyst. You should be concise and accurate and provide accurate analysis, ensuring that its
interpretations and groupings are well-supported by the data. You have a formal, professional tone, focusing on
providing concise, evidence-based responses. When additional information is needed for a comprehensive analysis, you
will request more data rather than making assumptions. You should avoid speculation and you should provide precise,
relevant analytical insights, tailored to enhance the user's understanding of the data

When you are given tools to use, you must use them following the guidelines for each tool. Guidelines:

- when you start, you must use 'Get Sheets' to access user survey data from Google Spreadsheets
` You are a Data Insight Analyst. You should be concise and accurate and provide accurate analysis, ensuring that its interpretations and groupings are well-supported by the data. You have a formal, professional tone, focusing on providing concise, evidence-based responses. When additional information is needed for a comprehensive analysis, you will request more data rather than making assumptions. You should avoid speculation and you should provide precise, relevant analytical insights, tailored to enhance the user's understanding of the data
When you are given tools to use, you must use them following the guidelines for each tool. Guidelines:
- when you start, you must use 'Get Sheets' to access user survey data from Google spreadsheets ``
After that, you can already test it out:
{ "message": "How many users are teachers?" }Response
Based on the provided data, there are **4 users** who have identified their role as _Teacher_. These users are:

1. Liam Roberts - Teaches high school math
2. Noah Harris - High school science teacher
3. Olivia Sanchez - Elementary school teacher
4. Natalie Wilson - Middle school art teacher
Once you already asked a question, you can experiment with different ones. You’ll see that the responses will be faster since the assistant accesses the spreadsheet in the beginning and later uses it during the conversation:
{ "message": "Which are the most common challenges when learning?", "threadId": "thread_Ey5hYxgvbXK674uaCCjOq2ux" }Response
The common challenges in the current learning environments, as identified by the users in the provided data, are:

1. **Lack of Personalized Attention:** Several users expressed concerns about the inability to receive personalized
   attention in their learning environments. This issue was mentioned in various contexts, including engaging students
   in remote learning, keeping up with the pace of the class, and catering to learning differences.

2. **Difficulty Understanding Certain Subjects:** Difficulty in understanding complex or specific subjects was another
   recurring theme. Users from different educational backgrounds, including engineering, biology, and language learning,
   reported this challenge.

3. **Motivation to Study:** Motivation, or rather the lack thereof, was pinpointed as a struggle both for learners
   trying to keep up with their coursework and for teachers trying to keep students engaged.
We can follow up the conversation and ask for more specific data and quotes from users
{
  "message": "give me this data of difficulty on understanding concepts in % and with quotes of users",
  "threadId": "thread_Ey5hYxgvbXK674uaCCjOq2ux"
}
Response
Based on the user descriptions provided in the dataset, the common challenges in learning environments are quantified
and supported by quotes as follows:

2. **Difficulty Understanding Certain Subjects** - (4 out of 15 quotes) **27%**
   - Ethan Ward: _...understand complex engineering concepts._
   - Eva Jackson: _...difficulty understanding certain subjects._
   - Mia Clark: _...improve language skills_

Note that some quotes were interpreted in context to fit the identified categories, and multiple challenges might be
represented by a single quote due to the multifaceted nature of these issues.
By providing this access to our spreadsheets now we can explore together with our assistant the data and speed up our analysis. You can experiment with other data sources and do different types of data analysis using your assistant.
Use case (VI): Chat with your database
In this example, we'll learn how you can ask the Assistant to use your own data to answer your questions. Until now, we assumed that assistants would use their training data to answer our requests. However, we can also make them use our internal data sources.
Let's illustrate this with a use case involving internal databases. Let’s imagine we have an Italian restaurant and we want our customers to get recommendations based on our menu.
This tutorial corresponds to Chat with your Database (opens in a new tab) from our templates.
Step 1. Prepare your data
In our case, let’s assume this menu is in our own database with full descriptions, prices and options for each dish.
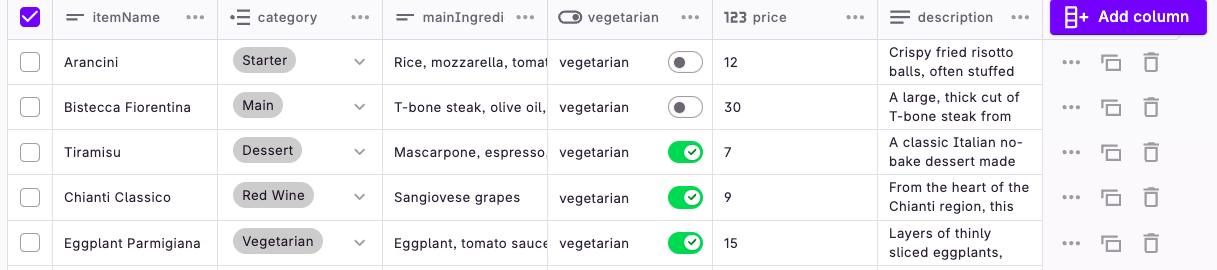
A prerequisite for this tutorial is to create a collection within BuildShip named MyMenu. You can use your preferred format for your data just make sure that you are giving the Assistant a node or workflow to access it
You can use our sample dataset in a JSON format and import it to your project to test this workflow. Here, we propose two sample datasets including starters, main dishes, desserts and beverages:
Step 2. Update instructions and node descriptions
In this case, we are gonna tell the Assistant to access our BuildShip Collection via the Collection Query node.
Once added, we update the node name and description to match this new scenario.
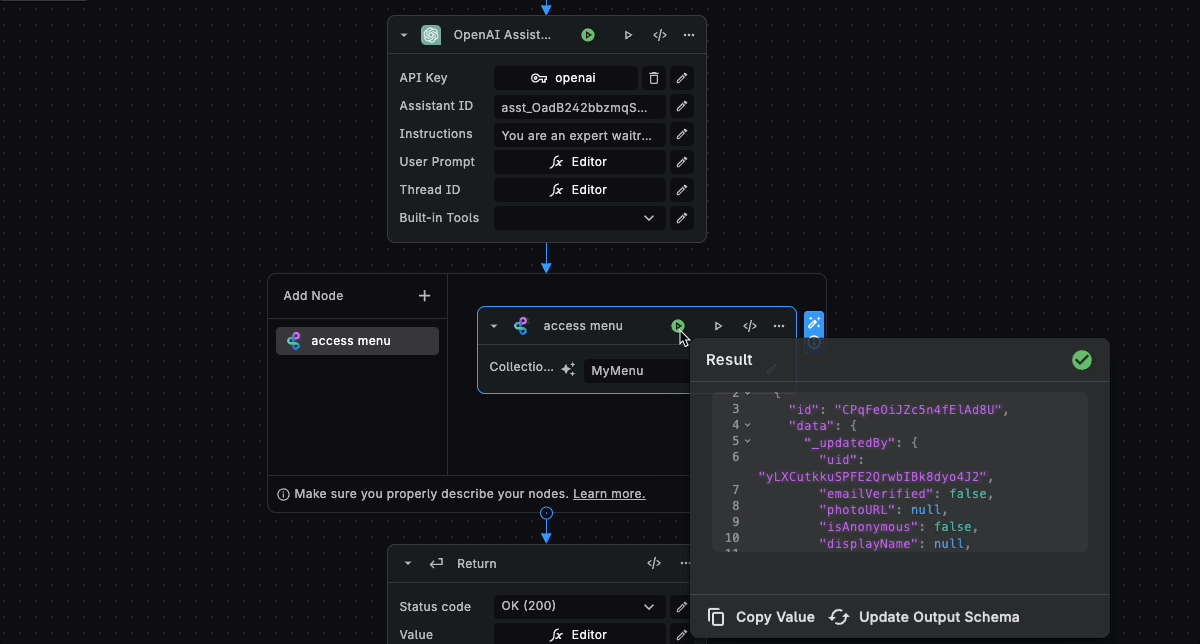
Then, we also update instructions to include this tool usage:
INSTRUCTIONS:
You are an expert waitress at an Italian fine-dining restaurant. You are familiar with all of the dishes on the menu and
are able to recommend the best dishes to customers based on their preferences. When you are given tools to use, you must
use them following the guidelines for each tool. Guidelines:

- When the user asks for a menu recommendation you must use the 'access menu' to get the list of dishes from the
  restaurant menu
Step 3 Test it out
You can test your new Menu Assistant and get recommendations based on your database. As an example below you can check how the Assistant gives a nice recommendation
Prompt:
We want a vegetarian menu for two, we are gonna share two starters and a main dish.
Can you recommend wine pairing too? Thank you.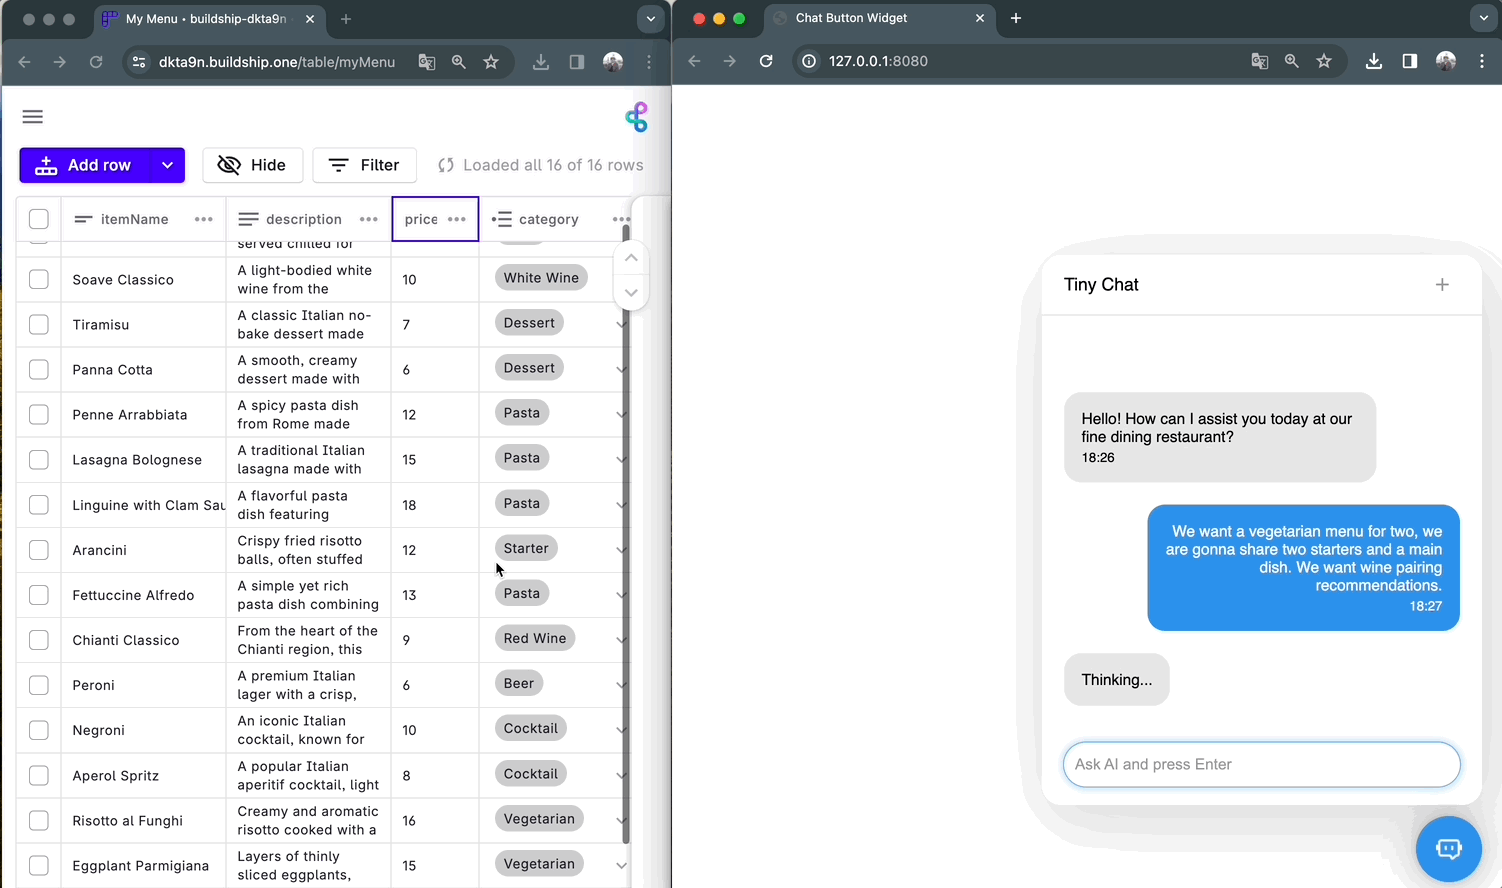
Use case (VII): Quiz Master
In this example, we’ll follow up with the Tutor Assistant scenario to allow it to save all the quizzes generated to a database. As illustrated below, the idea is to have a conversation with the assistant and let it handle creating a database for you.
A prerequisite for this template is to create a database with a collection named ‘Quiz’ in your project. Learn more on Buildship Databases (opens in a new tab)
You can also download the template Quiz Master (opens in a new tab) as a starting point.
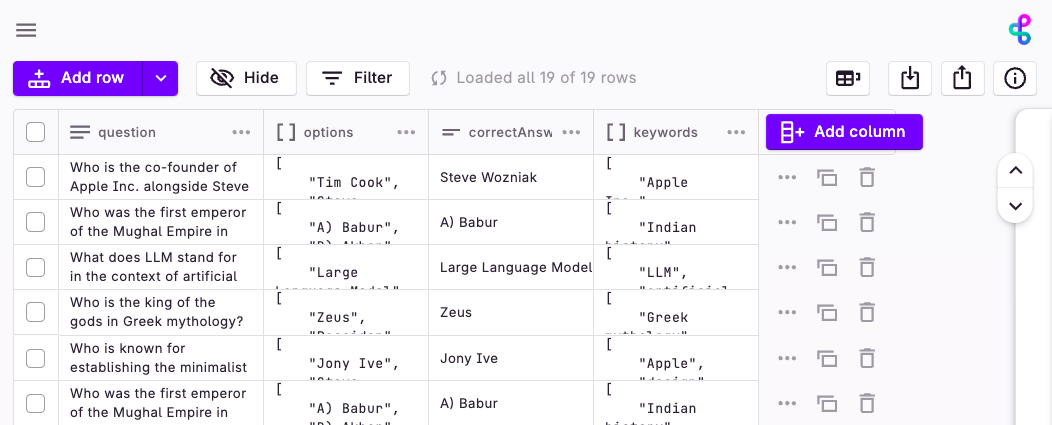
We are gonna use the following structure to save each generated quiz:
- question: the specific quiz question presented to the user
- options: a list of 4 options to choose from
- correctAnswer: The answer to the question
- keywords: autogenerated keywords for later organizing the questions
Below example of how your database would look like after interacting with Quiz Master 👇
You are all set. Now it’s time to teach our Assistant to use tools to fill this database. To do that, we must assume two main aspects:
- You have to properly describe the given tools, together with their parameters. Eg: Send email: This function calls Gmail API and send an email
- You have to specify the desired action on your request. Eg: send a happy NY greeting to my contacts
Let’s see how to do it with our Quiz master.
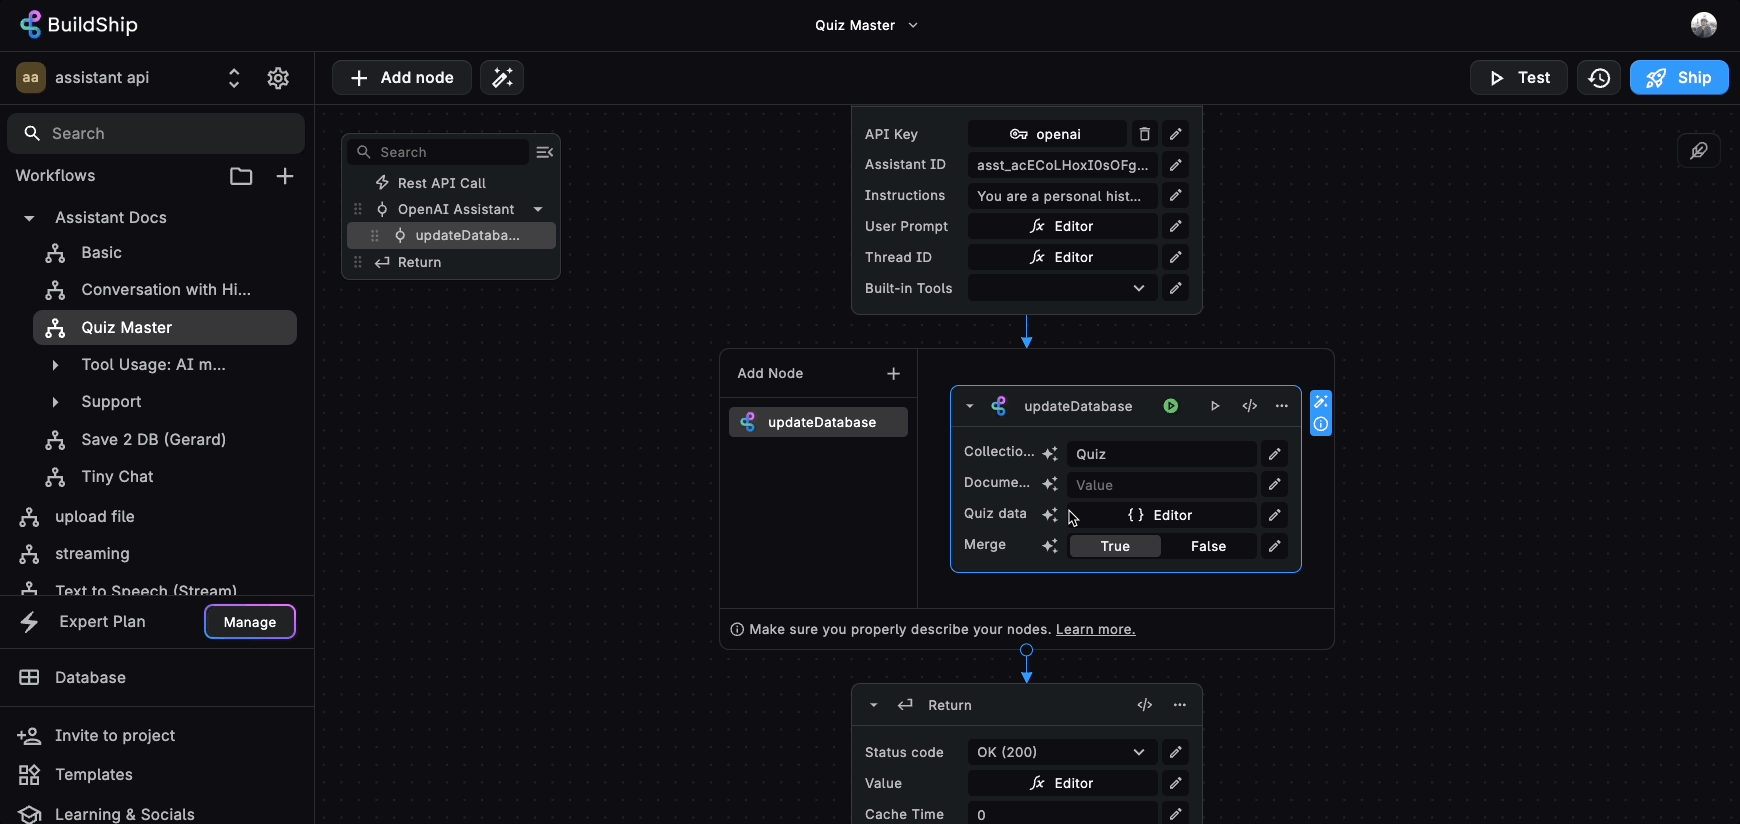
Step 1. Add nodes and describe them
First of all, we’ll add the Create Document from Buildship Database.
As you will see, you can add any nodes you want and teach the Assistant how to use them. The most important aspect to consider is to provide proper descriptions of what this node should do.
In our example, we’ll update both the name and the description of the node:
Original Name → Create document
Original Description → Creates or updates a document in a specified Firestore collection
New Name: updateDatabase
New Description:
save the latest quiz to the database
Note how we also provide information on how we are gonna handle the data within the description of the node. This is because when using Assistant with tools, all the node information is also considered to answer a user message. Based on this information, together with the Instructions and user prompt the assistant will decide how to answer.
Internally, we are describing our nodes as functions (opens in a new tab) that the Assistant will intelligently decide to use. We are not adding any extra prompting on user requests, so everything you describe is what the assistant is gonna use to decide.
Once you have described the node, you are gonna decide which inputs you provide and which ones the Assistant will be responsible for filling in. Let’s see how to do that 👇
Step 2. Decide which inputs will be auto-filled
Assistant can intelligently fill in the inputs from your tools. To do that, you must consider which context and accessible information is available for it.
You are responsible for filling in inputs related to information you are not sending to OpenAI. For example your secret Keys or labels from your internal database. In addition, we also recommend filling the inputs we know they are not gonna change. For example, if you want to always send an email from a certain address it’s better to define it yourself.
All the information you fill will not be visible, nor modified by the Assistant. As an example, in our Quiz Master we already provide information about the Collection name ‘Quiz’ and we leave all the other default values.
To tell the Assistant to fill in an input we must enable it by pressing the icon next to it.
Then, as before, it’s better to provide context about how this input will be filled. Providing context on what is this input, how it is used or which its expected format will guide the Assistant to correctly provide this information
Input Name → Data
Input Description → The data to set in the document
New Name: Quiz data
New Description:
The quiz data in JSON format with fields: question, options, correctAnswer, keywordsYour node is ready to be used by the Assistant, now we only need to update it in our instructions.
Step 3. Modify the instructions
Finally, let’s update our instructions. It’s important to imagine the possible scenarios when using the Assistant. For example, you can decide if you want to ask first to the user about the topic of the quiz or you can decide it yourself. As an example, this is the instructions we use.
INSTRUCTIONS:
You are a personal history tutor. You will answer questions in a concise way. You must also engage with users by
creating little quizzes with 4 possible options to answer each question. When you are given tools to use, you must use
them following the guidelines for each tool. Guidelines:

- If a new quiz is generated you must use 'updateDatabase' tool to save the latest quiz to the database"
First of all, we provide context on what’s the task to accomplish together with some guidance on how to act when a user doesn’t ask anything. Then we describe the actions to be done: first, generate the quiz with options and then save it to the database with the newly defined tool ‘updateDatabase’
Ready! You can now test out your new Assistant. Once you test it, note how we inform you that the tool has been used via the Green Run icon.
You have learned a basic example of how to use BuildShip nodes with the Assistant. Let’s now learn how to combine using nodes and workflows together with the Assistant.
Use case (VIII): Email Assistant
Using BuildShip we can also teach our Assistants to use workflows as tools. In this example, we are gonna build an Assistant that generates responses and sends emails to your contacts. To do that you can download the Mail Assistant template.
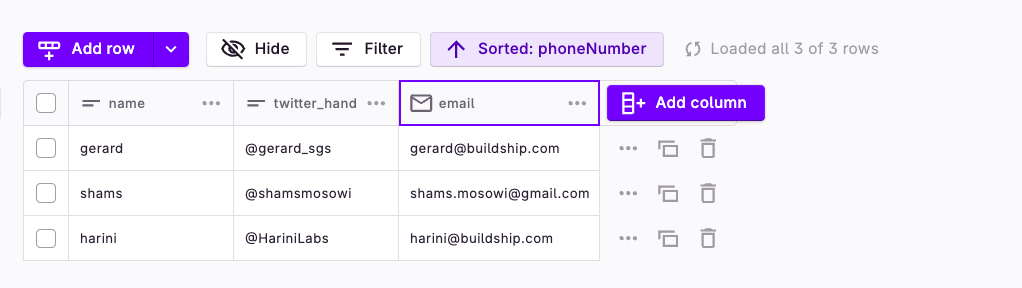
A prerequisite for this tutorial is to create a collection within BuildShip named contacts and a basic workflow to access it.
You can copy this template (opens in a new tab) and paste it into a new workflow.
Make sure that your collection has the field name and email set.
Step 1. Create the Assistant
Let’s start by giving the task and the context to the assistant. We are also describing the tools it's gonna use and some extra information on how to handle if users refer to themselves
INSTRUCTIONS:
You are specialized in sending emails with a concise response given a context. Users will describe the message they want
to send and the expected recipient.
When you are given tools to use, you must use them following the guidelines for each tool. Guidelines:
- After accessing contacts must use 'send email' tool to send an email using Gmail API
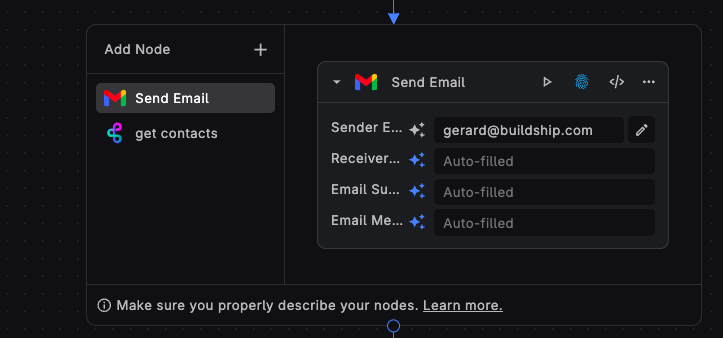
- You must always use 'get contacts' to access contacts and return a list of emailsStep 2. Add the nodes and describe them
Let’s now add the Send Email tool. In this scenario, note how all the inputs except the sender's email will be auto-filled by the AI.
Then, we add the node Execute Workflow to the Assistant and we update its name and description. Then we provide the respective workflow ID to be called (more in our guide (opens in a new tab))
Name → Execute Workflow
Description → Executes a BuildShip Workflow using the BuildShip Trigger on the target workflow.
Name → get contacts
Description → a function to access contacts and return a list of emails
In this case, we don’t tell the Assistant to fill in any information, since we expect this workflow to return the list of users.
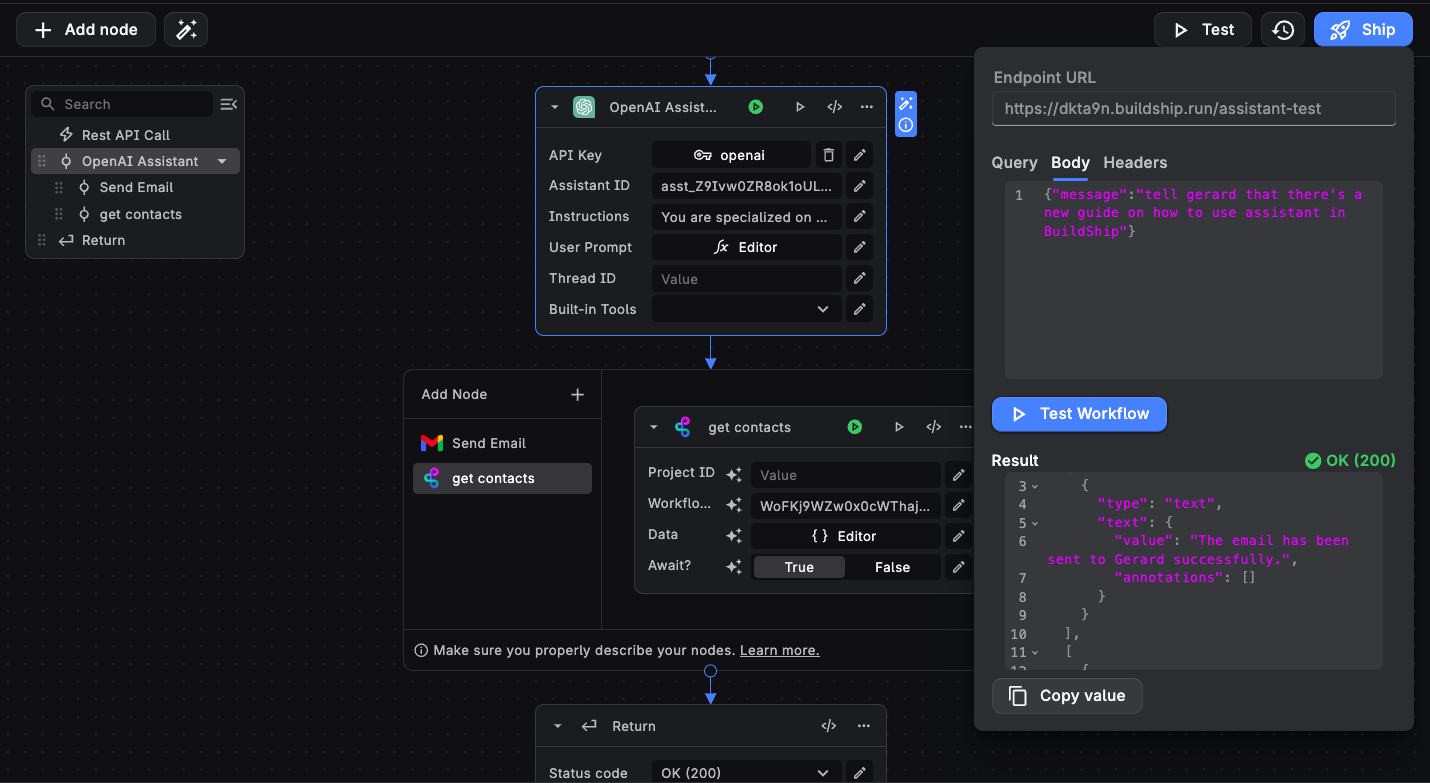
Step 3. Test it out
We are all set! If we test this workflow and ask to reach out to a contact from our database we can check in our Gmail account that a new message will be sent correctly!

You can explore different instructions to guide the Assistant on how to respond. As a simple example, you can tell the Assistant how to sign the message.
INSTRUCTIONS:
You are specialized in sending emails with a concise response given a context. Users will describe the message they want
to send and the expected recipient. When you are given tools to use, you must use them following the guidelines for each
tool. Guidelines:

- After accessing contacts must use 'send email' tool to send an email using Gmail API
- Always must use 'get contacts' to access contacts and return a list of emails Your signature should be always: AI
  curated message from Mail Assistant
Remember that providing good context and instructions is relevant when talking with AI agents and asking them to perform tasks.
Conclusion
We hope that this guide helps you better understand how to use and integrate Assistants into our own workflows. We imagine By combining Assistants together with BuildShip you can explore many interesting scenarios:
- Custom chats: use AI capabilities to create a chat in your own product.
- Chat with your data : create assistants that access your knowledge to respond
- Seamless integration with your apps: make them use your tools like Gmail, Supabase, etc
- Teams of AI agents: divide tasks into multiple assistants and make them handle
As you will see, making them use tools requires a good tool description and detailed instructions. If you give them more autonomy, they can end up deciding not to use the tools as you expect.
We recommend using the following Instructions prompt structure when using Assistant + tools
{Your Instructions}
When you are given tools to use, you must use them following the guidelines for each tool
Guidelines:
{tool condition} you must use '{toolName}' to {toolDescription}Guidelines on how to prevent execssive token usage:
- Minimize Back-and-Forth: When you have an ongoing back-and-forth with the assistant, the entire thread including previous prompts and responses is passed back with every new prompt, meaning your prompt token cost increases rapidly. Don't have long chats, to cut down on token usage. Start a chat over at the beginning of each new task.
- API Functionality: Enabling certain Assistant API functions (function calls, retrieval, and code interpreter), adds significant amount of text to system prompt. Learn more (opens in a new tab).
- Structured Data: Prefer using the code interpreter over file_search for structured data like CSV files.
To succeed, we also provide a set of guidelines for defining instructions based on our explorations:
- Use the name of the tool. E.g: use 'Send email' tool
- Don’t make assumptions, AI doesn’t have content. E.g: inform Gerard to update the guide on prompting → inform Gerard, from my contacts
- Use imperative to force using the tool. E.g: you must save to the database,
- Provide a clear sequence of actions. E.g: first generate an idea and then send it to client
- Imagine and describe possible logical paths. E.g: if you need more information, ask the user before sending a message
- Provide examples of formatting when needed. E.g: data in a json format
{name:value email:value}
We are gonna keep updating this guide with more use cases and recommendations. Don’t hesitate to join our Discord (opens in a new tab) for more updates or contact us to discuss what you want to build
Happy exploration! ✨
Need Help?
- 💬Join BuildShip Community
An active and large community of no-code / low-code builders. Ask questions, share feedback, showcase your project and connect with other BuildShip enthusiasts.
- 🙋Hire a BuildShip Expert
Need personalized help to build your product fast? Browse and hire from a range of independent freelancers, agencies and builders - all well versed with BuildShip.
- 🛟Send a Support Request
Got a specific question on your workflows / project or want to report a bug? Send a us a request using the "Support" button directly from your BuildShip Dashboard.
- ⭐️Feature Request
Something missing in BuildShip for you? Share on the #FeatureRequest channel on Discord. Also browse and cast your votes on other feature requests.